| Welcome, Guest |
You have to register before you can post on our site.
|
| Online Users |
There are currently 5 online users.
» 0 Member(s) | 5 Guest(s)
|
|
|
| Hollow Knight Silksong: How Environmental Hazards and Tools Redefine Combat |
|
Posted by: xtameembb - 10-09-2026, 02:33 PM - Forum: My Forum
- No Replies
|
 |
Since its 2025 release, Hollow Knight: Silksong has been celebrated as one of the most daring sequels in the modern metroidvania space. Team Cherry could have simply given players more of the original Hollow Knight, but instead the studio embraced radical change and growth. The result is a game that feels both familiar and unmistakably new. In 2026, that willingness to evolve still stands out, especially in the way Silksong treats combat and level design. Hornet is not the silent Knight; she is a defined character with a voice, a past, and a far more acrobatic presence. Her journey through Pharloom is not just a retread. It is a rethinking. Many of the biggest differences were easy to predict from trailers and from Hornet's original appearance: fluid movement, aerial grace, and a more talkative protagonist. Yet the subtler mechanical distinctions deserve just as much attention. Among them, the relationship between combat tools, traps, and environmental hazards is one of the smartest design choices in the game.
Combat as a Ballet of Blades and Tools

Hollow Knight: Silksong's combat is a considerable leap forward from the first game. Hornet has a far wider arsenal of weapons and skills, and her acrobatic movement often lends battles a ballet-like elegance. Momentum and style flow through encounters in ways that were rare in the original Hollow Knight. Could the first game's combat have supported such graceful, fast-paced exchanges? Not without losing its own identity. Silksong instead builds a new identity around speed, positioning, and tactical choice. The game's other most important pillar, level design, serves to buttress that combat. Arenas are not neutral boxes. They are stages filled with dangers that can become weapons.
One of the most discussed additions is the tool system. Items such as Sting Shards and Tacks can be dropped in tactical locations, funneling enemy forces toward environmental hazards or simply adding to their damage output. In essence, these traps are addendums to the magic offensive abilities of the first Hollow Knight. They provide the player with a greater variety of options during combat encounters, adding a layer of dynamism and flexibility that greatly enhances the overall experience. This design philosophy perfectly synergizes with Silksong's environment design, because the player is not merely fighting enemies. The player is also reading the room, planning a route, and crafting a build that turns terrain into an advantage.
Environmental Hazards Are Not Just Obstacles

There are a number of environmental hazards in Silksong, which is not exactly surprising considering its genre conventions. But what is somewhat surprising is how much the player can manipulate these hazards, making clever use of them to dispatch enemies more efficiently. For example, Pharloom is littered with bulging, explosive boulders that hang from cave ceilings like deadly stalactites. These will often be used for puzzle-solving, but Hornet can also attack them and cause them to drop, creating an explosion below. When timed correctly, these boulders can deal considerable damage, even taking out several enemies at once. Such circumstances rear their head time and again, since Silksong is replete with such dangerous natural formations.
This interactive approach changes the rhythm of combat. Instead of treating every hazard as a punishment, Silksong treats many of them as opportunities. A ceiling-bound explosive can become a preemptive strike. A narrow corridor can become a kill zone. A room full of spikes can become a trap for enemies rather than only a threat to Hornet. The player learns to ask: can this danger be turned against the enemy? Is it worth spending a tool charge to create a better position? These questions are small, but they accumulate into a combat system that rewards awareness.
System
Player Action
Tactical Outcome
Explosive boulders
Strike the boulder so it falls
Area damage, multi-kill potential
Sting Shards and Tacks
Place them in strategic spots
Funnels enemies, adds DPS
Acrobatic movement
Use Hornet's mobility
Better positioning, ballet-like flow
Environmental hazards
Lure enemies into danger
Efficient kills, resource preservation
The Synergy Between Traps, Tools, and Terrain
Combat in Silksong is much more focused on planning, strategic positioning, and build-crafting, courtesy of Hornet's tools. Items like Sting Shards and Tacks can be dropped in tactical locations, funneling enemy forces toward environmental hazards or simply adding to their DPS. In other words, it is remarkably effective to combine tools, traps, and basic melee attacks with things like the previously mentioned explosive boulders. This aids the gameplay experience in surprising ways. For one thing, it allows fights to be unexpected and varied depending on where they take place. But the offensive capabilities of these environmental hazards also serve to reward players for paying attention to their surroundings.
Since Silksong is all about exploration and learning the lay of the land, this is quite a clever and appropriate way to further incentivize critical thinking and pattern recognition. The game does not need to force players into a single correct answer. Instead, it gives them a toolbox and a world full of dangerous furniture. A player who ignores the environment can still fight, but a player who studies it can dominate. That difference is meaningful because it turns every room into a potential puzzle. It also makes repeat visits more interesting, since a space that once seemed hostile may later become a favorite ambush point.
Why Subtle Design Choices Matter
Could Silksong have simply repeated the first game's formula? Of course it could have. But would that have been as memorable? Probably not. The flashy differences, such as Hornet's acrobatics and her ability to speak with NPCs, are easy to notice. The subtler mechanical distinctions, however, are what make the game's combat endure. Team Cherry did not just add new moves. The studio rebuilt the relationship between the player, the enemy, and the environment. In 2026, that is still one of Silksong's greatest strengths.
Hollow Knight: Silksong is all the better for its willingness to embrace radical change and growth. It respects its predecessor without being trapped by it. It gives players more of what they wanted while also asking them to think differently. In a sequel, that is a rare balance. And in a genre crowded with imitators, it is a reminder that true evolution often comes from the quiet details: a dropped boulder, a well-placed tack, a moment of perfect positioning. Those details may not dominate a trailer, but they define the experience.
The instincts Silksong rewards don't stay inside the game for long. Scouting a room before committing, weighing a tool against its cost, and holding out for the moment when a risky move pays off — that's the same mindset that separates a good deal from an impulse buy. Whether you're hunting down a new controller with reliable triggers, a headset that won't betray you during a late-night boss attempt, or simply the game itself at a price that doesn't sting, the players who come out ahead are the ones who look around before they leap.
That habit of checking your surroundings translates surprisingly well to shopping. Instead of grabbing the first listing you see, you can scan multiple retailers, weigh what each one actually offers, and commit only when the numbers make sense. If you'd rather spend ten minutes planning than ten dollars regretting, compare prices here at DealNest before you check out — the same patience that turns a hostile room into an ambush point tends to turn a full-price purchase into a bargain.
|

|
|
| Silksong Act 2 Guide: Essential Steps and Where to Go First |
|
Posted by: xtameembb - 10-09-2026, 10:00 AM - Forum: My Forum
- No Replies
|
|
After defeating The Last Judge and triggering the Act 2 cutscene, Hornet finally enters the Citadel in Team Cherry's Silksong. Unlike the more linear Act 1, Act 2 opens up a sprawling, interconnected map that has left many players wondering: what should they do first? With the game now well into 2026, veterans and newcomers alike continue to seek direction. This guide breaks down the most important early objectives in the Citadel, from buying maps to hunting the Threefold Melody.
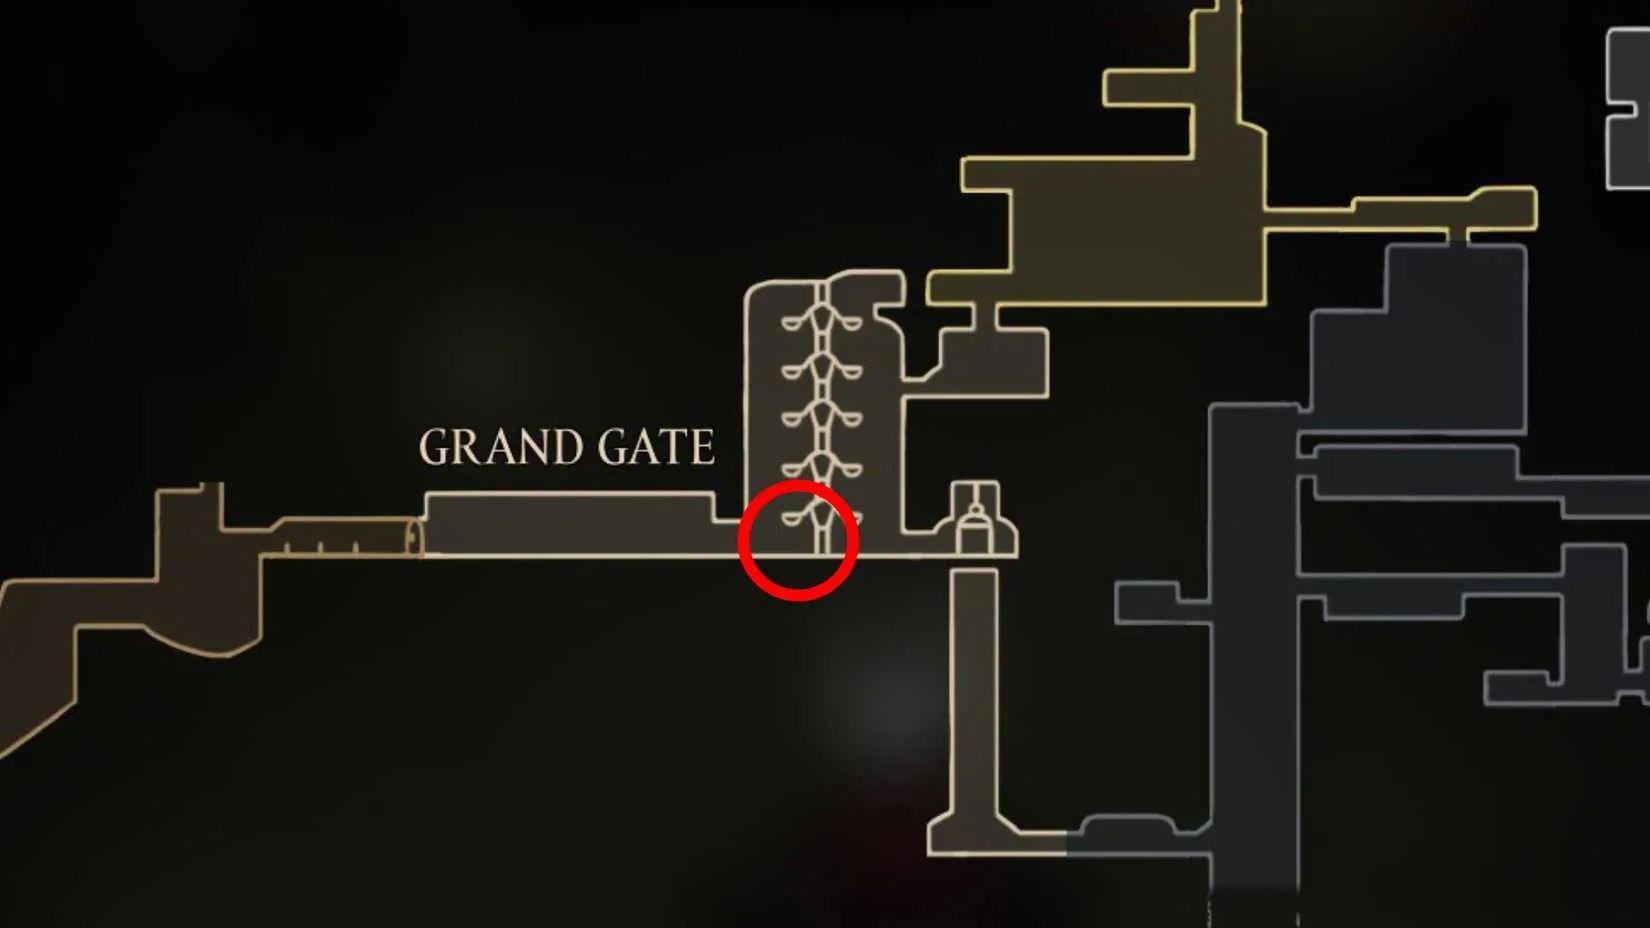
1. Purchase the Grand Gate Map (40 Rosaries) ?️
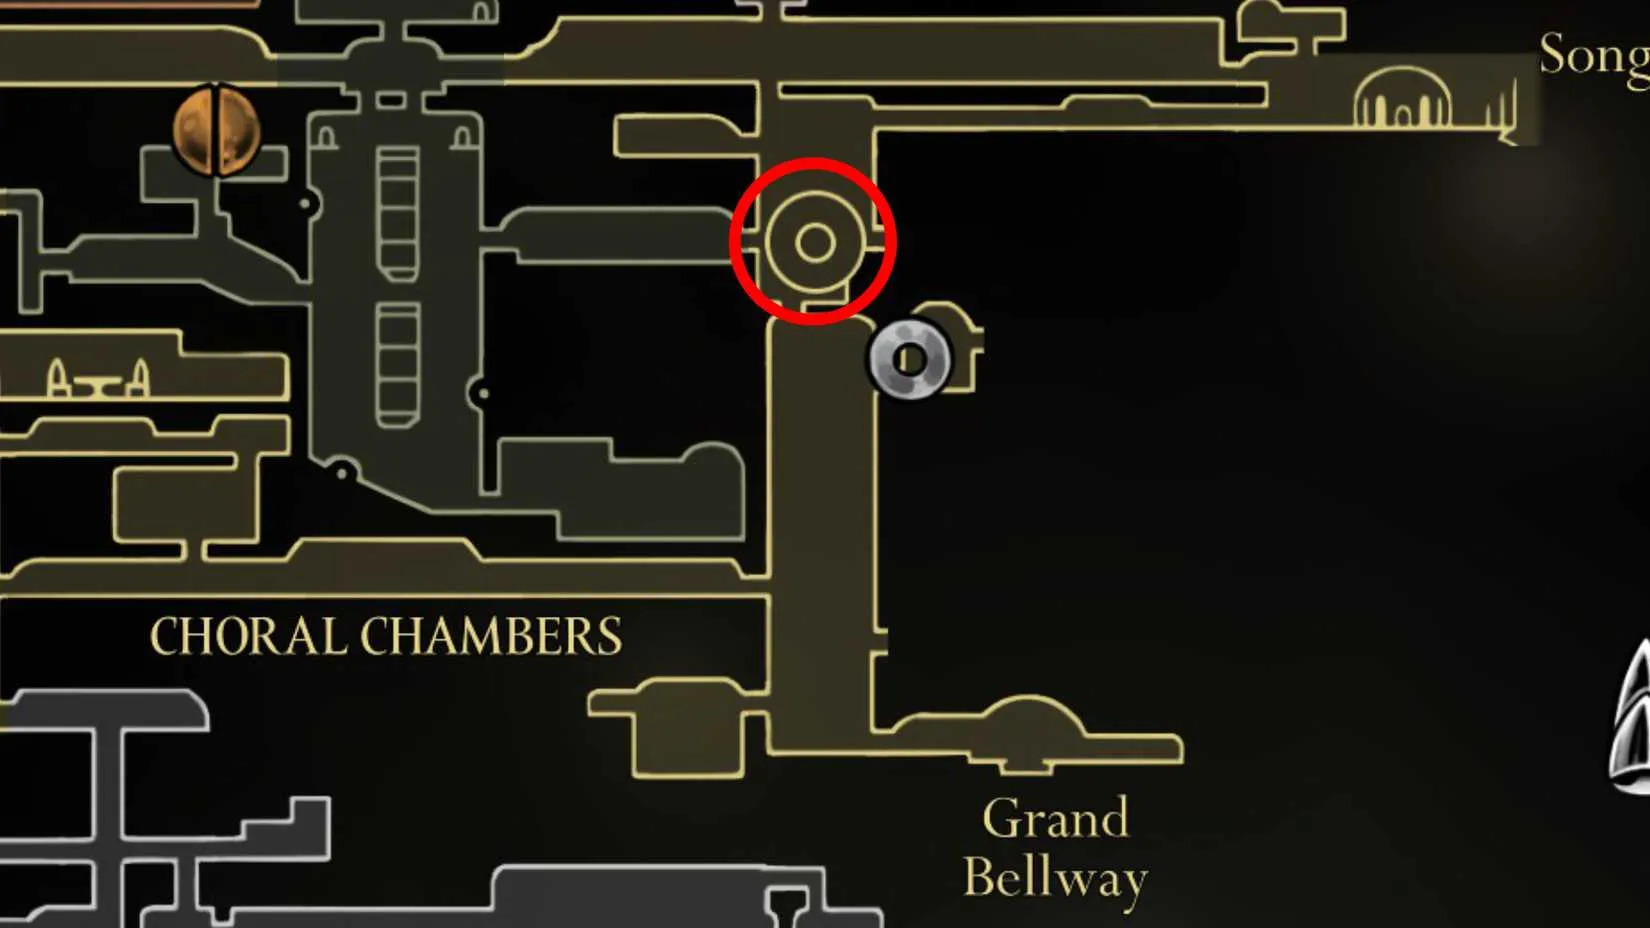
The very first thing players should do in Act 2 is buy a map. Unlike Act 1, where maps came from NPCs like Shakra, most Citadel maps are sold by machines. In the first room of the Citadel, players will find one such machine. Interact with it and pay 40 Rosaries to receive the Grand Gate map. This small zone connects the Blasted Steps to the larger Choral Chambers above, but it is a crucial starting point.
2. Grab the Free Underworks Map
From the Grand Gate map machine, head right and drop down into The Underworks. This eerie sub-area is filled with forced labor bugs and deadly fans that deal two Masks of damage. Traverse upward until you spot a sign with lines and shapes. Enter that room to find the Underworks map pinned to a board — it costs nothing. Then continue upward to reach the Choral Chambers.
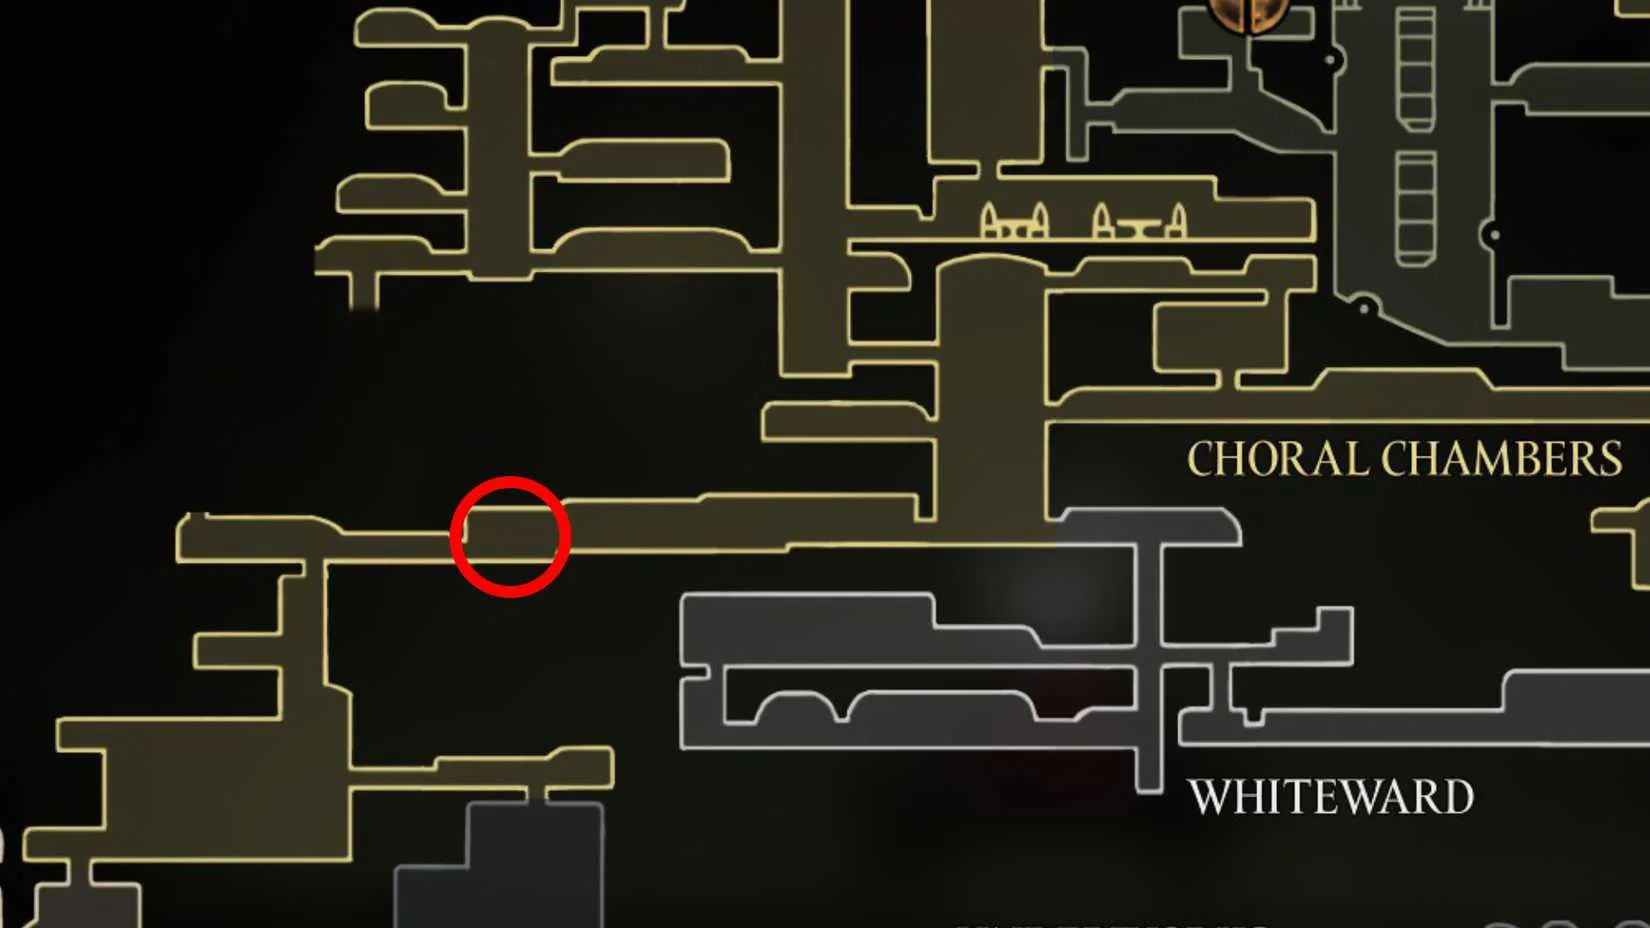
3. Buy the Choral Chambers Map (70 Rosaries) and Find Ventrica
Continue through the Choral Chambers until you reach another map machine at the start of a long, slightly angled room with three enemies. Purchase this map for 70 Rosaries. Then go left to discover your first Ventrica station, a fast-travel point that will prove invaluable later.
4. Unlock the Shortcut to The Slab ?️
Normally, reaching The Slab requires players to let Hornet get captured by a large enemy in the Deep Docks. However, there is a shortcut on the left side of the Choral Chambers. This path connects almost directly to a Bench and the Slab Bellway station. Why is this important? Because later, players must return to the Slab Bellway to reach Mount Fay, which contains a powerful movement item — but only after acquiring the Clawline ability somewhere in the Citadel.
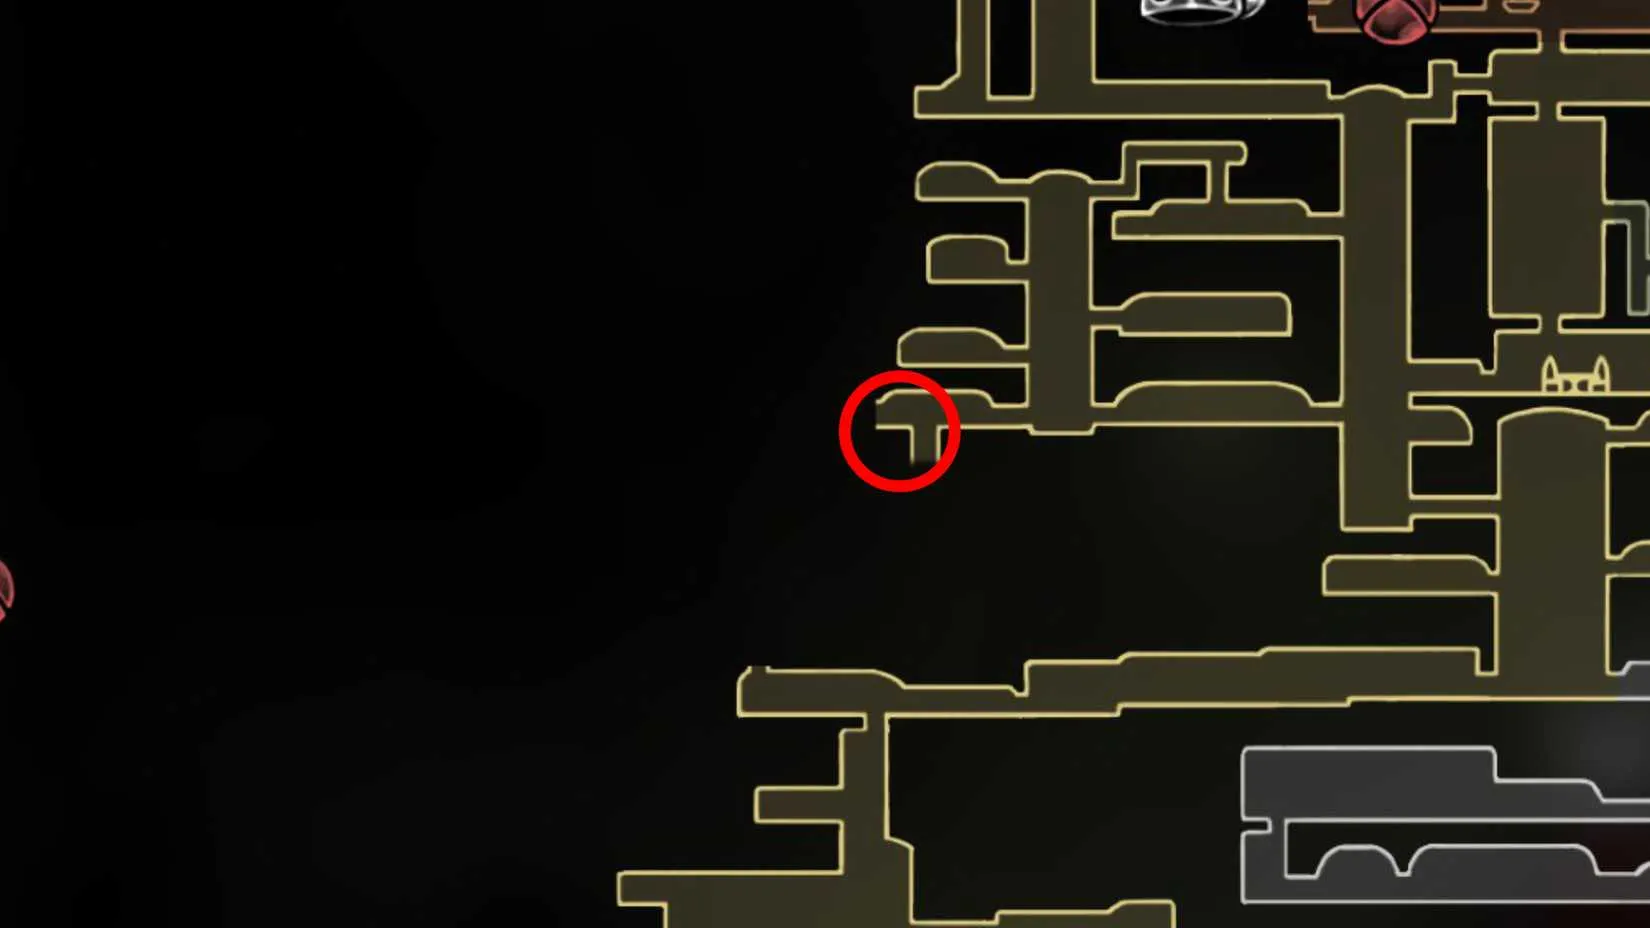
5. Defeat the Cogwork Dancers ⚔️
At the very top of the Choral Chambers, players will face the Cogwork Dancers, the first major boss of the Citadel. This fight is not the hardest in the game, but it is one of the most tragic and beautifully designed. Hornet battles two dancers who move in time with the music, telegraphing their attacks. The fight has three phases as the song accelerates. After defeating one dancer for the third time, it is destroyed. The remaining dancer continues alone in a somber fourth phase. After winning, players unlock the Cogworks Core below and the rest of the Choral Chambers to the right.
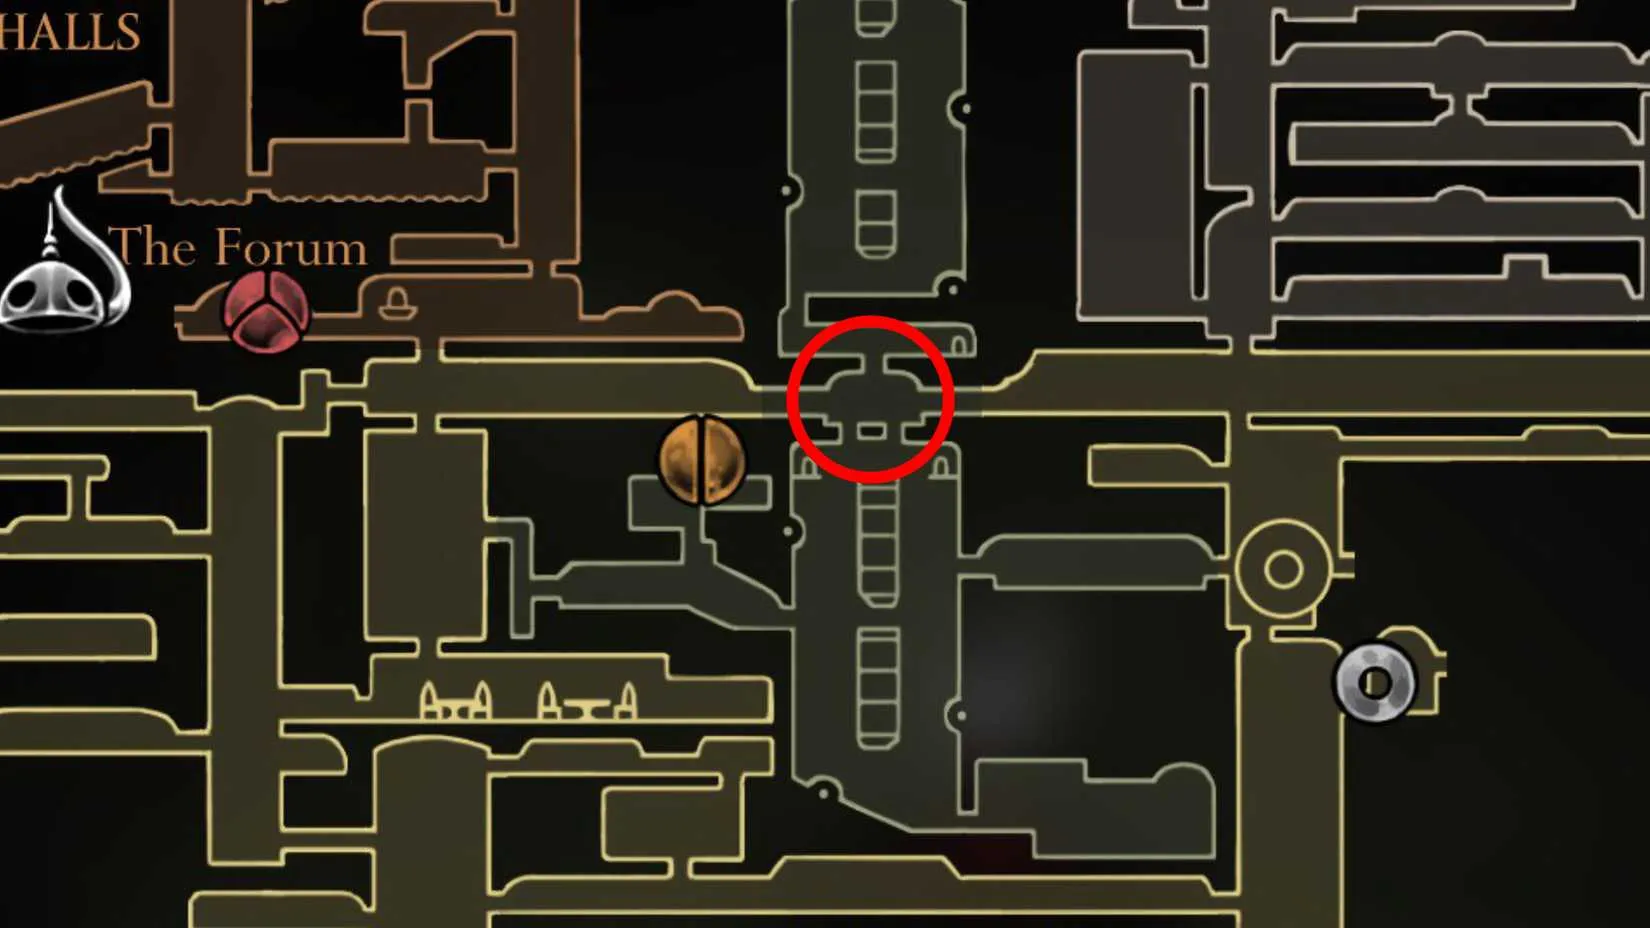
6. Ring the Grand Bell to Unlock Songclave ?
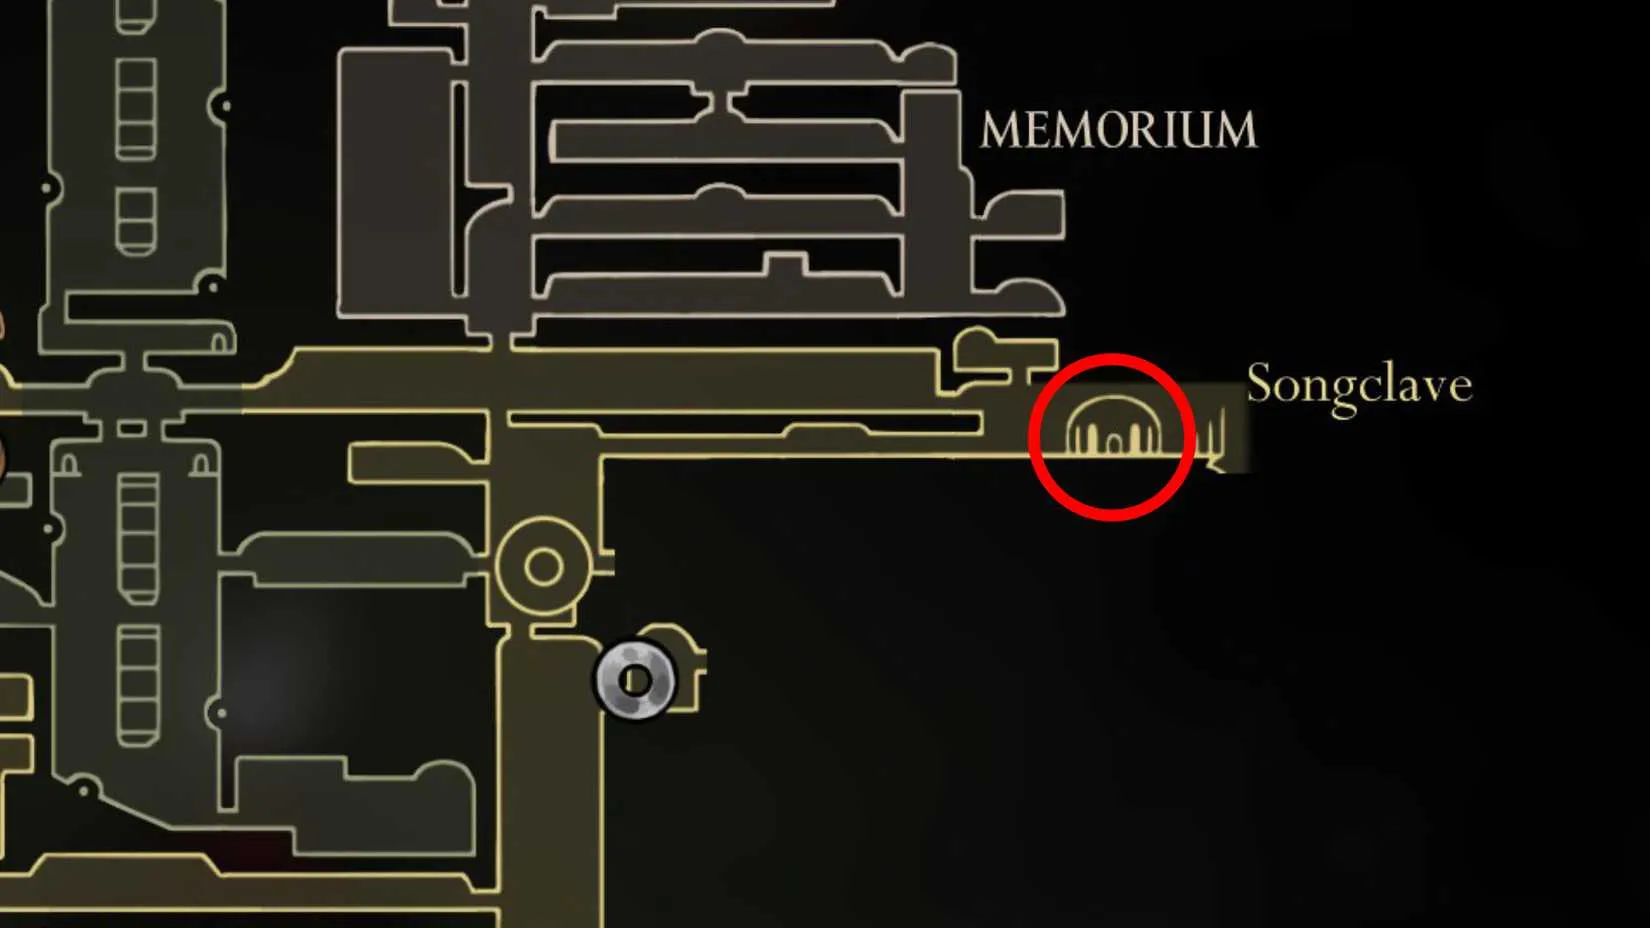
After the Cogwork Dancers, head right — carefully jumping over two tough, large enemies — to reach a strange building on the far top-right of the Citadel. Enter and ring the bell inside to spawn a bench. Outside, an NPC named the Caretaker asks if you rang the bell and warns that it will call pilgrims. Later, this spot transforms into a new town hub called Songclave. The Caretaker may be annoyed, but players can now fulfill Wishwall requests from pilgrims.
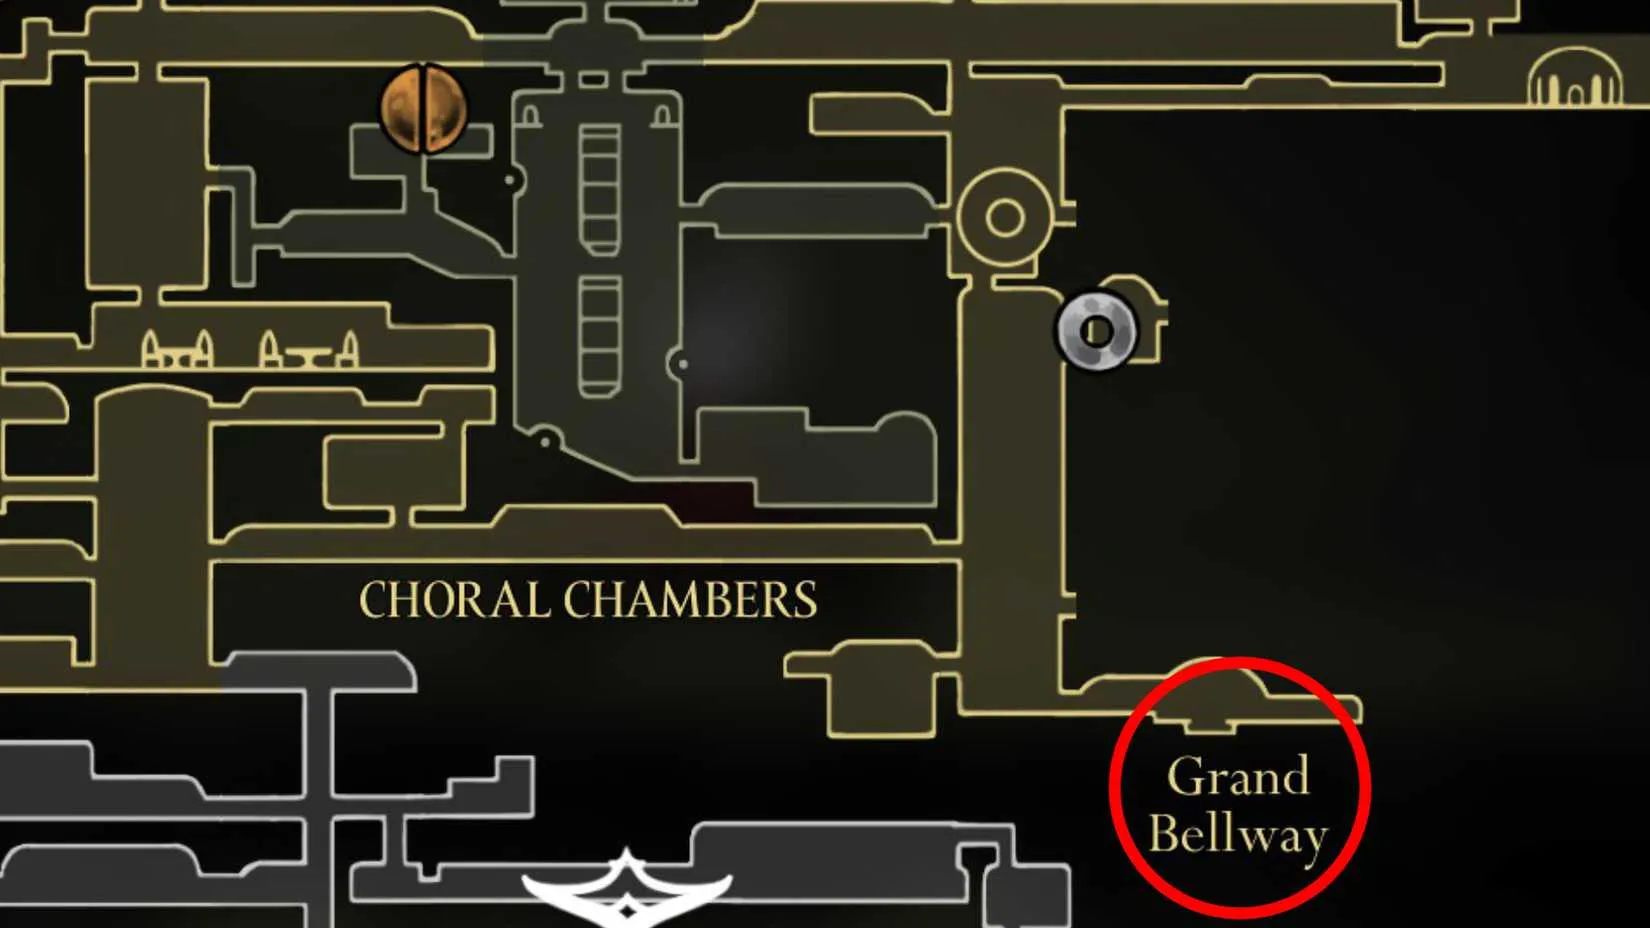
7. Locate the Grand Bellway in Choral Chambers
Make your way to the far bottom-right of the Choral Chambers to find the Grand Bellway, a Bellway station in the center of the Citadel. This provides convenient travel back to Act 1 areas, allowing players to collect missing Mask Shards, Spool Fragments, optional abilities, and complete side content.
8. Find Pale Oil in Whispering Vaults ?️
The Whispering Vaults are tricky to reach. They can only be accessed by turning a gigantic wheel-gate so its pathway faces left to right. To get there, return to the Cogwork Dancers arena and drop down into the Cogwork Core. This sub-zone resembles the Path of Pain from Hollow Knight. Go down three floors, then loop down, right, and up to reach the other side of the central column. Use all of Hornet's movement skills and bounce off cogs with downward slashes. At the top-right, continue pogoing off moving cogs, then head right. At the end of the hallway, find a room leading to the left side of the wheel-gate. Hit the lever, cross to the right, and enter the Whispering Vaults. Somewhere inside is a Pale Oil, which upgrades Hornet's Needle for a second time, increasing damage.
9. Hunt Down the Threefold Melody ?
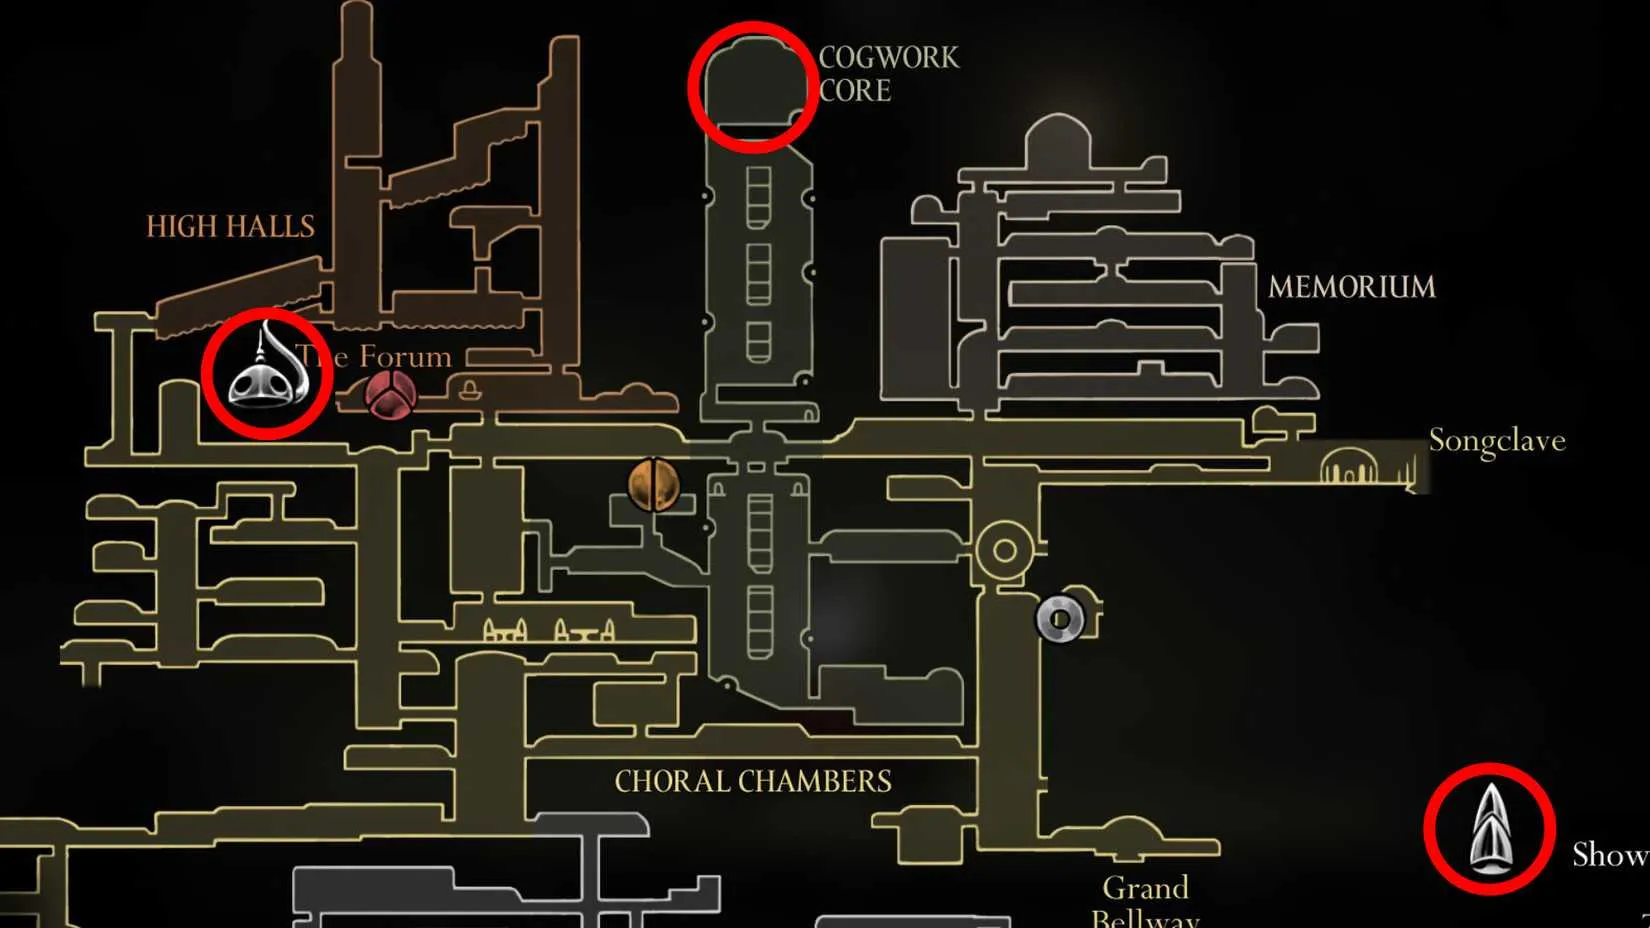
After defeating the Cogwork Dancers, the background of their arena rotates to reveal three ominous statues. Interact with them to learn Hornet's final task: find all three pieces of the Threefold Melody and play it before the statues. The pieces are hidden in difficult, out-of-the-way areas. Two are locked behind challenging gauntlet rooms in the top-left and bottom-right of the Citadel. The third is hidden high atop the Clockwork Core. This quest will take players through the Cauldron, deeper Whispering Vaults, Bilewater, High Halls, Whiteward, Memorium, and more.
Summary of Key Act 2 Objectives
Objective
Cost
Reward
Grand Gate Map
40 Rosaries
Map of starting zone
Underworks Map
Free
Map of sub-area
Choral Chambers Map
70 Rosaries
Map + Ventrica access
The Slab Shortcut
Free
Quick access to Slab Bellway
Cogwork Dancers
Boss fight
Access to Cogworks Core & Songclave
Grand Bell
Free
Songclave town hub
Grand Bellway
Free
Fast travel to Act 1
Pale Oil
Exploration
Needle upgrade
Threefold Melody
Long quest
Endgame progression
Conclusion
Act 2 of Silksong may feel overwhelming at first, but by following these steps, players can build a solid foundation. As 2026 progresses, the community continues to uncover new secrets and optimizations. So, what are you waiting for? Grab that map, ring that bell, and ascend the Citadel. ?
Silksong demands a lot from its players — long gauntlets, frame-perfect pogo timings, and boss fights that punish a single misread input. That kind of endurance run eventually takes a toll on your setup, whether it's a drifting analog stick, a muddy monitor, or a keyboard that has seen better days. Replacing gear mid-playthrough isn't cheap, though, so it helps to know where the genuine discounts live before committing to a purchase. DealNest gathers current offers on gaming hardware and accessories in one place, making it easier to tell a real price drop from a marketing illusion.
Not every Citadel explorer needs new equipment, of course — some are simply lining up their next adventure for the moment the credits roll. With so many metroidvanias and soulslikes arriving alongside Silksong, keeping tabs on sales is the easiest way to grow a library without draining your Rosaries. Whether you're after a bargain controller or a cheap copy of whatever comes next on your list, checking an aggregator before you buy is a habit that quietly pays for itself.
|
|
|
|
| Hollow Knight: Silksong – Putrified Ducts Route, Loot, and Survival Guide |
|
Posted by: xtameembb - 10-09-2026, 08:33 AM - Forum: My Forum
- No Replies
|
|
In 2026, Hollow Knight: Silksong players are still mapping every corner of Pharloom, and the Putrified Ducts remains one of the most elusive optional regions. It is among the couple of tricky areas that are only accessed through a specific route, and the path is not in plain sight. Hornet must destroy an obstacle to reveal the entrance, which makes the journey feel like a secret within a secret. Although reaching the Putrified Ducts can be time-consuming, the area contains many points of interest that make the trip worthwhile.
The Main Route Begins in Memorium
The Putrified Ducts is mainly available from the Memorium area in Hollow Knight: Silksong. A lower part can be accessed from Bilewater, but that small section does not connect to the rest of the region. What players will find there is the Broodfeast quest and the Key of Apostate. For the full experience, the Memorium approach is required.
To start, players should enter Memorium by heading north from the Grand Bellway, all the way to the top. Next, they must use the double jump, which is a necessity, to climb the platform and access the area. In Memorium, Hornet should jump to the platform containing the lore board, then hop to the one above it. Hornet will arrive at the second level of the area, and the path will split.
Through the Enemy Corridor
Proceeding right leads to an area infested with enemies in all shapes and forms. Players must fight the small and big spiders, then keep running to stumble upon a mini-boss near the end of the path. The mini-boss can be fought or ignored completely to quickly go through the door. After that, players should look down and carefully descend the platforms to reach the bottom while avoiding the enemies that roll around. This section rewards patience more than aggression.
Go through the door to the right with the hanging sign to enter a seemingly empty room. Walk inside further and look up to find a narrow tunnel. Double jump and Clawline upward, then proceed forward to land on a bridge. At the end of the bridge is a tall climbable wall. Using a combination of skills like cling grip and double jump is essential. Between the two walls is an obstacle that can be destroyed. Carefully stick Hornet to the wall and try to destroy the rocks to reveal a path.
Head right and enter the dimly lit tunnel. Proceed further without touching the spikes, and players will eventually reach the Putrified Ducts area. It is very similar to Bilewater, especially the maggot-filled swamp that decreases Hornet's silk. Luckily, there is an item in this area that can protect Hornet from this water for a short period of time. Additionally, there is an NPC that will help reveal the locations of the fleas that were missed while exploring Pharloom.
Route Summary Table
Step
Location
Required Ability or Item
Notes
1
Grand Bellway
Double jump
Head north to the top and climb into Memorium
2
Memorium
Double jump
Jump to the lore board platform, then to the one above
3
Split path
Combat or evasion
Proceed right into the enemy-infested corridor
4
Mini-boss room
Optional fight
The mini-boss can be skipped to reach the door faster
5
Descending platforms
Careful movement
Avoid the rolling enemies below
6
Empty room
Clawline and double jump
Look up for the narrow tunnel
7
Bridge and wall
Cling grip and double jump
Destroy the obstacle between the walls
8
Dim tunnel
Spike avoidance
Reach the Putrified Ducts
9
Putrified Ducts
Silk protection item
The swamp drains silk; the item grants temporary safety
10
Lower Bilewater section
Broodfeast quest and Key of Apostate
This part is accessible separately from Bilewater
Survival and Exploration Tips
The Putrified Ducts is not a place for careless exploration. The maggot-filled swamp is one of the most punishing environmental hazards in the region because it steadily decreases Hornet's silk. Players should locate the protective item early, then use its short window to cross dangerous stretches and reach safer ground. Silk management becomes a priority, since Hornet may need healing or offensive tools while navigating enemies and spikes.
The NPC in the area is another major reason to visit. This character helps reveal the locations of missed fleas across Pharloom, making the Putrified Ducts valuable for completionists. In 2026, with many players returning to old saves or starting fresh runs, this flea-reveal service remains one of the most useful rewards in the region.
The lower section accessed from Bilewater is easy to overlook. It does not connect to the rest of the Putrified Ducts, but it contains the Broodfeast quest and the Key of Apostate. Players who only take the Memorium route may miss these items entirely. A thorough explorer should visit both approaches.
Finally, the mini-boss near the end of the enemy corridor is optional. Fighting it may feel satisfying, but ignoring it is a valid strategy for players who want to preserve health and silk. The door is close enough that a quick escape is possible. Once inside the empty room, the real challenge becomes vertical navigation: Clawline, double jump, cling grip, and a sharp eye for the destructible obstacle.
With its hidden entrance, silk-draining swamp, optional mini-boss, and flea-revealing NPC, the Putrified Ducts is more than a detour. It is a compact test of everything Hollow Knight: Silksong asks from Hornet: mobility, combat awareness, environmental survival, and curiosity. The route from Memorium is long, but every step leads to rewards that justify the effort. For players aiming to complete Pharloom in 2026, the Putrified Ducts deserves a place on the map.
Once the Putrified Ducts are fully mapped and its rewards collected, many players start planning their next journey through Pharloom or looking for another challenging metroidvania to sink into. Comparing prices before buying can make that next adventure much easier on the wallet, especially when storefront discounts rotate quickly.
For anyone hunting for a discounted copy of Silksong, a DLC, or a similarly demanding action-platformer, DealNest is worth a look. It gathers current offers in one place, so you can browse game deals today before deciding where to spend your Geo—or your real-world currency.
|
|
|
|
| Hollow Knight: Silksong – Mastering Sister Splinter in 2026 |
|
Posted by: xtameembb - 10-09-2026, 07:55 AM - Forum: My Forum
- No Replies
|
|
In the sprawling, treacherous world of Hollow Knight: Silksong, few encounters test a player's mettle quite like the battle against Sister Splinter. As of 2026, this boss remains a notorious roadblock for many adventurers navigating the thorny depths of Shellwood. While Sister Splinter's individual attacks are relatively simple to read, the cluttered arena—filled with spiky brambles and relentless flying minions—can quickly turn the fight into a chaotic nightmare. However, with the right approach and a keen understanding of her patterns, players can transform this daunting challenge into a manageable skirmish.

?️ Where to Find Sister Splinter and the Nearest Bench
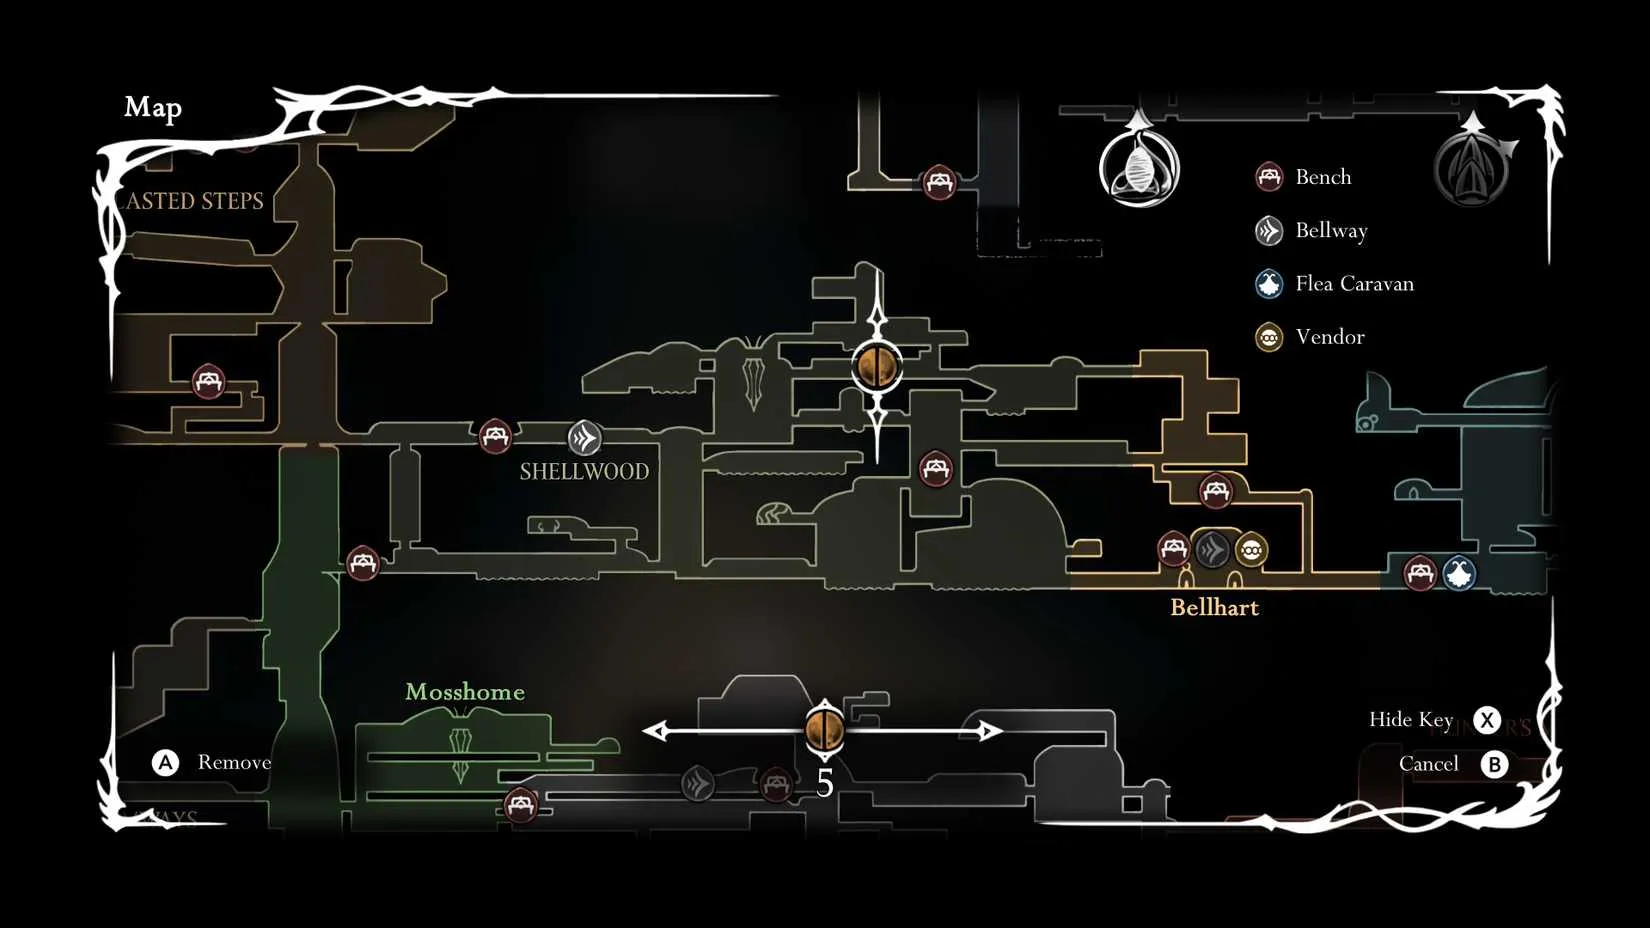
Sister Splinter resides deep within the heart of Shellwood, a region marked on the map. She guards the path to the wall jump ability, a crucial upgrade that opens up new exploration avenues. To reach her, players must first unlock the elevator that provides easy access to her chamber. Once unlocked, it's wise to rest at the bench near the center of Shellwood for the shortest runback. This bench costs 50 rosaries to unlock, so players should ensure they have enough currency on hand. From the bench, take the elevator up, enter the room to the right, and platform across and up the room. A series of pogo jumps across flowers will lead leftward into the boss chamber.
⚔️ Phase One: Keep the Arena Clear
In the first phase, the priority is maintaining a clean arena. When Sister Splinter retreats into the ceiling, spikes will slam down shortly after. These can be broken with a few hits. Players shouldn't waste time destroying every spike, but clearing those that restrict movement is essential. Her attacks come in sets of three, alternating left and right strikes. Beams of light telegraph incoming spikes, providing opportunities to dodge and heal. Staying on the correct side of her attacks allows for consistent damage. When staggered, she falls to the floor—players should move away to avoid impact damage, then use the opportunity to land hits or heal.
? Phase Two: Manage the Minions
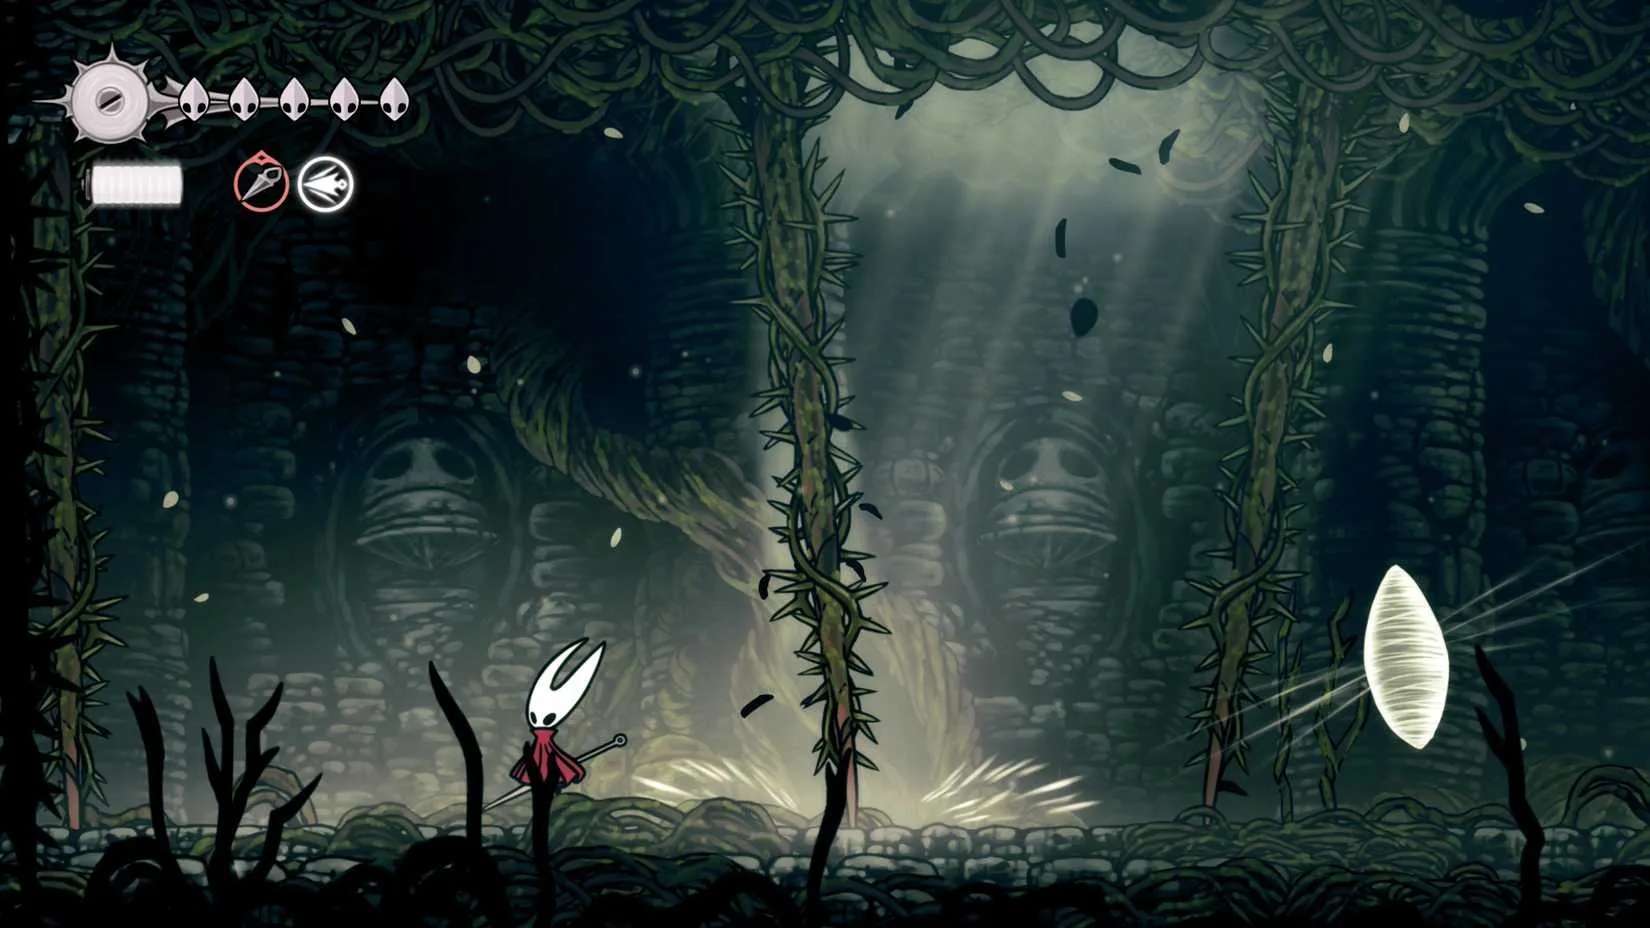
Phase two escalates the chaos. Sister Splinter summons flying enemies at the start, giving players only a few seconds to react. Instead of trying to melee them, use the Silkspear attack if silk is available—it kills them in one hit, preventing the pace from slipping. She continues to spawn flyers throughout the fight, so silk should be reserved for eliminating them rather than healing. Notably, her own attacks can kill these minions if they are in the path, which can be used to the player's advantage. If brambles accumulate too quickly, Silkspear can also one-shot them. Equipping a tool like the Longpin (found in a side room in Shellwood) or the Straight Pin as a backup is advisable.
Phase
Key Threats
Strategy
One
Spike drops, left/right strikes
Clear key spikes, dodge, punish staggers
Two
Flying minions, increased brambles
Use Silkspear on minions, stay aggressive
?️ Tips for Success
Stay aggressive: Passive play allows Sister Splinter to control the arena.
Use Silkspear liberally: It's the key to managing both minions and brambles.
Heal only during safe windows: Such as when spikes are telegraphed or after she is staggered.
Keep moving: Don't let yourself be cornered by spikes or flyers.
? After the Fight
Upon defeating Sister Splinter, players should exit the arena to the left. In the area beyond, a statue awaits—binding to it grants the wall jump ability. This ability is essential for reaching the boss fight above Bellhart and progressing through the first act of Hollow Knight: Silksong.
In 2026, with the game's community still thriving, Sister Splinter remains a rite of passage. By keeping the arena clear and using the right tools, players can overcome this thorny adversary and continue their journey through the hauntingly beautiful world of Pharloom. Whether you're a veteran or a newcomer, these strategies will help you turn a nightmare into a breeze.
If Sister Splinter has reignited your appetite for tough, atmospheric action-platformers, you might be looking for the next challenge to sink into after Pharloom. That's where DealNest comes in—it's a handy place to browse PC game discounts across a range of genres, so you can line up your next metroidvania or indie gem without paying full price. Whether you're hunting for something as demanding as Silksong or just want to bulk up your backlog, checking DealNest between sessions can be a smart move.
|
|
|
|
| From Clown Memes to Launch: Silksong's Miracle and Metroid Prime 4's Long Wait |
|
Posted by: xtameembb - 10-08-2026, 07:37 PM - Forum: My Forum
- No Replies
|
|
I still remember the exact moment I stopped treating Hollow Knight: Silksong like a myth and started treating it like a real game. When Team Cherry finally released its long-awaited Metroidvania on all platforms, I felt the same mix of disbelief and relief that had been building since 2019. The game did not just arrive—it landed with force. On OpenCritic, it holds a 95/100 Top Critic Average, with 100% of critics recommending it. On Steam, it sits at 91% positive despite recurring complaints about difficulty. For me, that tension is the point: Silksong is brutal, beautiful, and unapologetically demanding.

The Long Wait Was Not a Joke—Except When It Was
I followed Silksong from its brief 2019 announcement trailer through years of near silence. Team Cherry showed a few trailers here and there, but updates were rare. That quiet period turned into a strange community ritual. Fans made clown memes about Silksong, and I laughed at them because I was in them. Every Nintendo Direct, every showcase, every random Tuesday became a chance to put on the makeup again. The joke was never really about hating the game. It was about how much we wanted it and how little we knew.
Now that Silksong is out, those memes are mostly retired. The conversation has shifted to boss fights, tools, Crests, and the game's steep learning curve. I have seen plenty of players celebrate its difficulty and plenty of others bounce off it. That split feels healthy. A sequel to Hollow Knight was never going to be easy, and Team Cherry did not pretend otherwise.
Metroid Prime 4: Beyond Inherited the Clown Crown
If any game rivaled Silksong for the longest gap between announcement and release, it was Metroid Prime 4: Beyond. Nintendo first revealed it at its E3 2017 press conference, two years before Silksong's announcement. At the time, the game was literally just a logo. Nintendo said Bandai Namco's studios in Japan and Singapore would develop it, but that plan did not hold. In 2019, Nintendo restarted development because the initial version failed to meet internal expectations. Retro Studios, the original Metroid Prime team, took over. Retro had been working on an unannounced Switch platformer called Harmony, but that project was canceled to prioritize Metroid Prime 4.

For years, Metroid Prime 4 existed as a promise and a punchline. I remember watching fans ask for a trailer at every Direct, only to get another round of clown memes. Nintendo did not release a single trailer until June 2024. That reveal confirmed a 2025 release window for the Nintendo Switch. Later, Nintendo announced a Nintendo Switch 2 version with enhanced visuals and smoother frame rates. Even after multiple showings, Nintendo stayed oddly quiet about the exact release date, which made me nervous. I had already seen Silksong slip through enough windows to fear another delay into early 2026.
What 2026 Looks Like Now
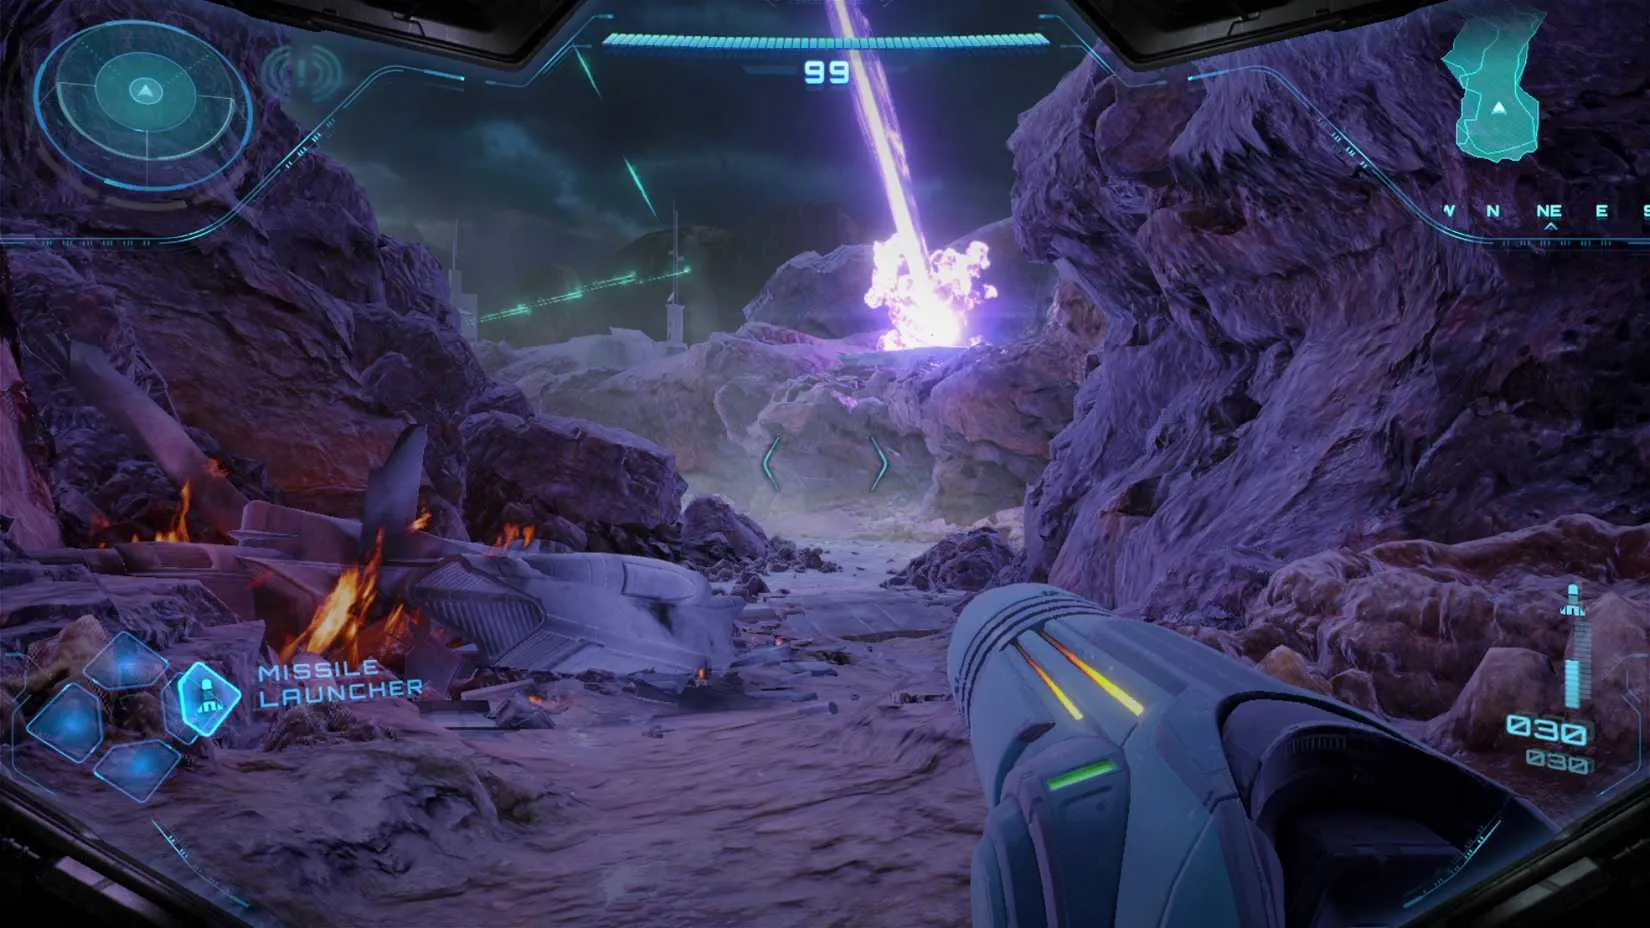
By 2026, the waiting game is finally over. Metroid Prime 4: Beyond has launched as a Nintendo exclusive for Switch and Switch 2, and the enhanced version on the newer hardware delivers the smoother frame rates and cleaner visuals Nintendo promised. I have spent time with both games now, and the contrast is fascinating. Silksong is a handcrafted, punishing 2D labyrinth from a small team. Metroid Prime 4 is a first-person sci-fi adventure from a veteran studio that had to rebuild its project from scratch. Both took years to reach players, but they took very different roads.
Game
Announced
Released
Key development note
Hollow Knight: Silksong
2019
2025
Team Cherry stayed quiet for years, fueling clown memes
Metroid Prime 4: Beyond
E3 2017
2025
Rebooted in 2019; Retro Studios took over from Bandai Namco

The clown memes are dead now. I do not miss the uncertainty, but I do miss the shared absurdity a little. There was something oddly bonding about waiting for a game that felt like it might never arrive. Silksong and Metroid Prime 4 both turned that waiting into a community language. When the games finally launched, the language changed from jokes to impressions, complaints, favorite bosses, and favorite weapons.
The Real Lesson From Two Long Waits
I think the lesson is not that delays are good. They are not. Metroid Prime 4's reboot cost years and canceled another project. Silksong's silence frustrated even the most patient fans. But both cases show that a long wait does not automatically mean a bad game. It means development is messy, especially when a small team or a rebooted studio is trying to meet impossible expectations.

As a player in 2026, I am just glad I can finally talk about these games as games. Silksong earned its 95/100 OpenCritic average and its 91% Steam positivity, even if its difficulty keeps some players at arm's length. Metroid Prime 4: Beyond finally crossed the finish line and gave Switch and Switch 2 owners a new Samus adventure. The clown makeup is off. The controllers are on. And for once, the only mystery left is what Team Cherry and Retro Studios will do next.
That curiosity about what comes next tends to send me back through older catalogs, and it is easy to forget how expensive a backlog can get when every long-awaited release lands in the same window. Between Silksong, a new Samus adventure, and the steady stream of indies that fill the gaps in between, most players I know are trying to stretch a budget across far more games than they can finish. I have started being more deliberate about when I buy, waiting for the moments when prices actually drop instead of grabbing things at launch out of habit.
Lately I have been checking best game deals before committing to anything, and it has changed how I approach the hobby. Finding a discount on a title I was already curious about makes it easier to take a chance on the weirder, smaller releases that big studios would never fund, which is exactly the kind of variety that keeps this medium interesting between the blockbusters.
|
|
|
|
| Silksong Guide: Reach High Halls and Grab the Map Without Losing Your Mind |
|
Posted by: xtameembb - 10-08-2026, 04:14 PM - Forum: My Forum
- No Replies
|
|
So you've clawed your way into the Citadel in Hollow Knight: Silksong, and now you're staring up at High Halls like it's the world's most hostile apartment building. Well, it is. The Citadel is packed with platforming sections that will punish you for missing a single jump, and enemies that chase you like you owe them money. High Halls, accessible soon after leaving the Underworks, is no exception. But don't worry—this guide will walk you through the route, the tricks, and the map location. And yes, there will be spikes. So many spikes.
First, a quick reality check: you need the Clawline ability. Without it, you're just a bug with a needle and a bad attitude. Once you have Clawline, your first task is to find and defeat the Cogwork Dancers boss. Yes, those mechanical ballet nightmares. After they're scrap metal, head down and left to reach the top left section of the Coral Chambers. There, you'll spot a Bench directly below a few grapple points. Sit on it. Seriously, sit on it. You'll thank yourself later.
From the Bench, start making your way up using Clawline. The first section is relatively simple—just go right and ignore the enemies. Why fight when you can run? Use your dash to zip past them if you're feeling fancy. When you reach the grapple wheel, harpoon onto a hook and wait for it to rotate upward. Then use your abilities to slip through the top right passage. More enemies? Ignore them again. Dash over their heads like the graceful spider you are.
Now the real fun begins. You'll enter a room with spikes on the bottom and another grapple wheel. This time, ignore the wheel. Instead, float downwards, carefully avoiding the spikes. You'll see a grapple on your right—Clawline to it immediately, or you'll become a Hornet kebab. Once you're holding on, wait a few seconds. The spikes below you will retract. Then float down. You'll have to do this little dance again. After that, you'll spot an enemy. Avoid it by going further down. Easy, right?
Be careful in the next section. You have to move Hornet while floating to avoid spikes, and then harpoon one last time. This is where many players rage-quit. But you're better than that, aren't you? After the final harpoon, go further down. When you see the sign of a Ventrica Station on your right, head through the passage. You'll come across a Bench. Interact with the Station if you have Rosaries—but make sure you have 70 remaining, because there's a machine on the right that sells the map for High Halls. Yes, you have to pay for the privilege of knowing where you are. Capitalism at its finest.
Here's a quick summary table for the visual learners:
Step
Action
Tip
1
Get Clawline, defeat Cogwork Dancers
Don't skip the Bench
2
Go up from Coral Chambers Bench
Ignore enemies, dash past
3
First grapple wheel
Wait for rotation, go top right
4
Second room with spikes
Ignore wheel, float down, Clawline right
5
Wait on grapple
Spikes retract, then float down
6
Repeat, avoid enemy
Go further down
7
Final floating section
Move Hornet mid-air, harpoon
8
Reach Ventrica Station
Need 70 Rosaries for map
Why bother with High Halls at all? Because it's there. Also, it's packed with lore, secrets, and a few shiny things that completionists crave. In 2026, players are still debating whether High Halls is harder than the rest of the Citadel. (Spoiler: it is.) But the view from the top? Worth every spike.
The enemies in the Citadel are relentless. They'll chase you across rooms, through tunnels, and into your dreams. But here's a secret: most of them are slow enough to outrun. Use your dash, use your Clawline, and never look back. If you do get hit, don't panic. Hornet can take a few hits. Just don't fall on spikes. Spikes don't care about your feelings.
Rosaries are the currency of Pharloom. If you're broke, you might need to farm some before attempting this route. Or just sell your soul. Your choice. But remember: 70 Rosaries for the map is a bargain compared to wandering around blindly for hours. Trust me, you don't want to be that bug.
So, are you ready to conquer the Citadel's highest halls? Or will you let a few spikes break your spirit? Grab your Clawline and get climbing. The map won't buy itself.
If your controller's analog stick has started drifting after one too many failed harpoons, or you're hunting for a cheaper copy of the game to hand off to a friend, it pays to know where the actual discounts are. Rather than tab-hopping between storefronts and hoping a sale pops up, you can compare prices here and let DealNest do the scouting — useful whether you're after peripherals sturdy enough to survive a boss fight or just a good deal on the next title in your backlog.
DealNest gathers listings in one place, so you spend less time grinding through pages and more time actually playing. No spikes, no rage-quits, just a quick look before you commit.
|
|
|
|
| Beyond Shellwood: Hornet's Road to the Citadel in Silksong |
|
Posted by: xtameembb - 10-08-2026, 03:08 PM - Forum: My Forum
- No Replies
|
|
The canopy of Shellwood had finally gone quiet. Hornet stood among the hanging vines with a new trick woven into her limbs — the Cling Grip, the wall-clinging skill that every traveler in Pharloom eventually needs and that no one can afford to skip. Shellwood is not an optional detour; it is a gate, and the gate has just swung open. So the question that follows is a natural one, the same question that has sent thousands of players scrolling through forums in 2026: what now? Where does the pilgrimage go once the trees stop talking?
The answer is not east, and it is not deeper into the woods. It is back toward the people Hornet left behind — specifically, toward the haunted settlement of Bellhart.
First, Break the Curse in Bellhart ?️
Before any gate in the Citadel will acknowledge her, Hornet needs a voice that can answer the Citadel's own music. That voice comes from the Needolin, and the Needolin can only be earned by lifting the curse that has settled over Bellhart. Until that curse breaks, the road ahead is simply a wall with scenery painted on it. This is why the sequence matters so much: Cling Grip opens Shellwood, and Bellhart opens everything after it.
Once the Needolin hums in her grasp, the map changes shape. Songs become doors. Ledges become invitations.
The Shortcut Out of Shellwood ?
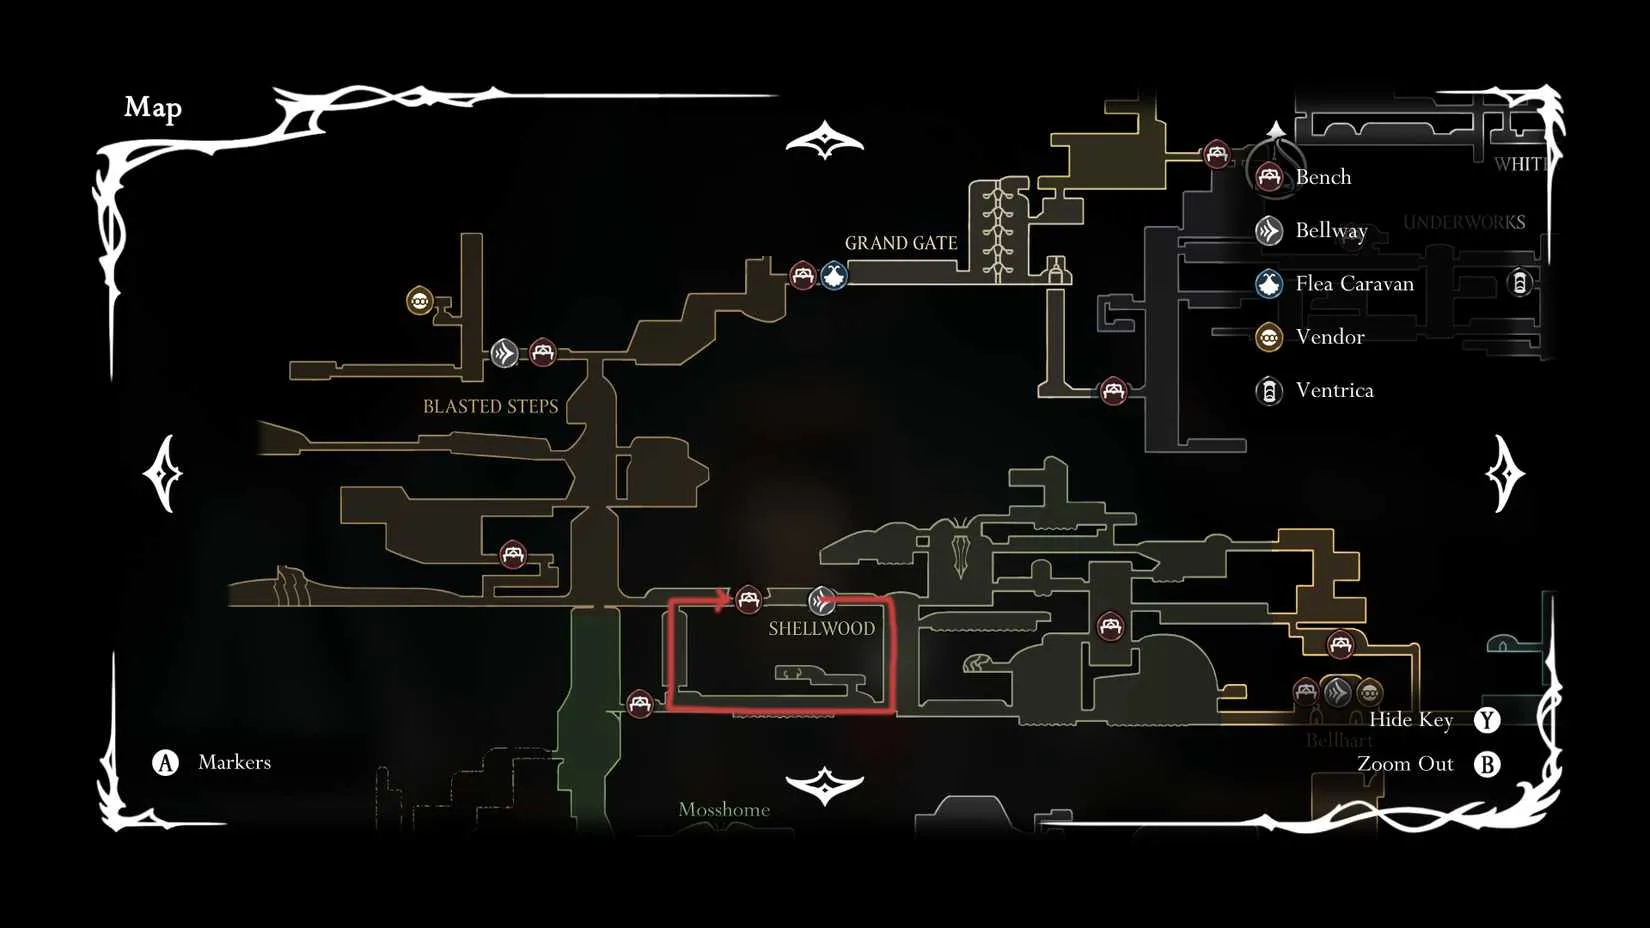
Most travelers assume they must crawl all the way back through Bone Bottom and start the western trek from scratch. There is a better way, and it hides in plain sight. Hornet should move toward the bench that links Shellwood to Bone Bottom — but she should not drop down to it. Just before reaching that bench, she needs to look up. A passage hangs overhead, and the freshly acquired wall jump is the key to it. Climbing that shaft unlocks a bench sitting directly beside the Shellwood Bellway, which turns a long walk into a short hop.
From that bench, the route unfolds like this:
Step
Action
Reward
1
Run left through the large open room until an upward path appears
Progress toward the Steps
2
Climb and locate the bench
A safe place to rest and save
3
Head left, then up, into the tall vertical chamber
Access to the eastern rooms
4
Enter the right-hand room from the vertical area
Shakra's location
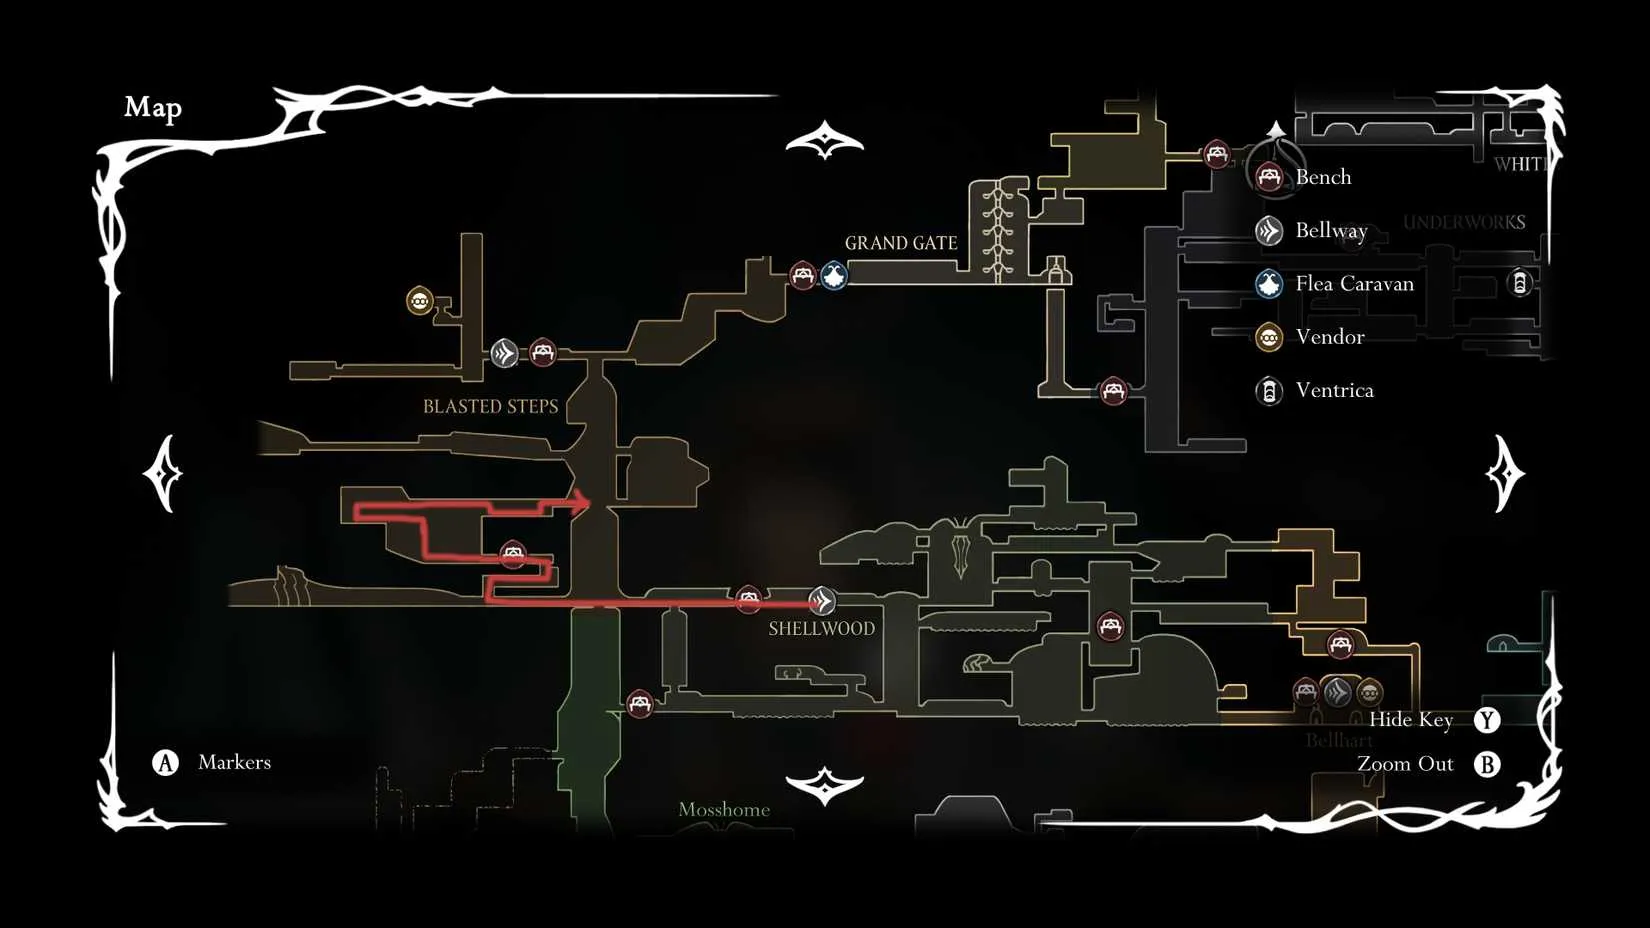
Finding Shakra and the Blasted Steps Map ?️
The vertical chamber is the landmark to watch for. Once Hornet reaches it, she should slip into the room on the right, where the wandering merchant Shakra waits. Shakra sells the Blasted Steps map, and buying it is not a luxury — the region is a maze of wind, sand, and crumbling stone, and going in blind is how runs end. There is a simple tell for whether the right room has been found: Shakra's signature rings begin appearing on the ground, scattered like coins from a pocket.
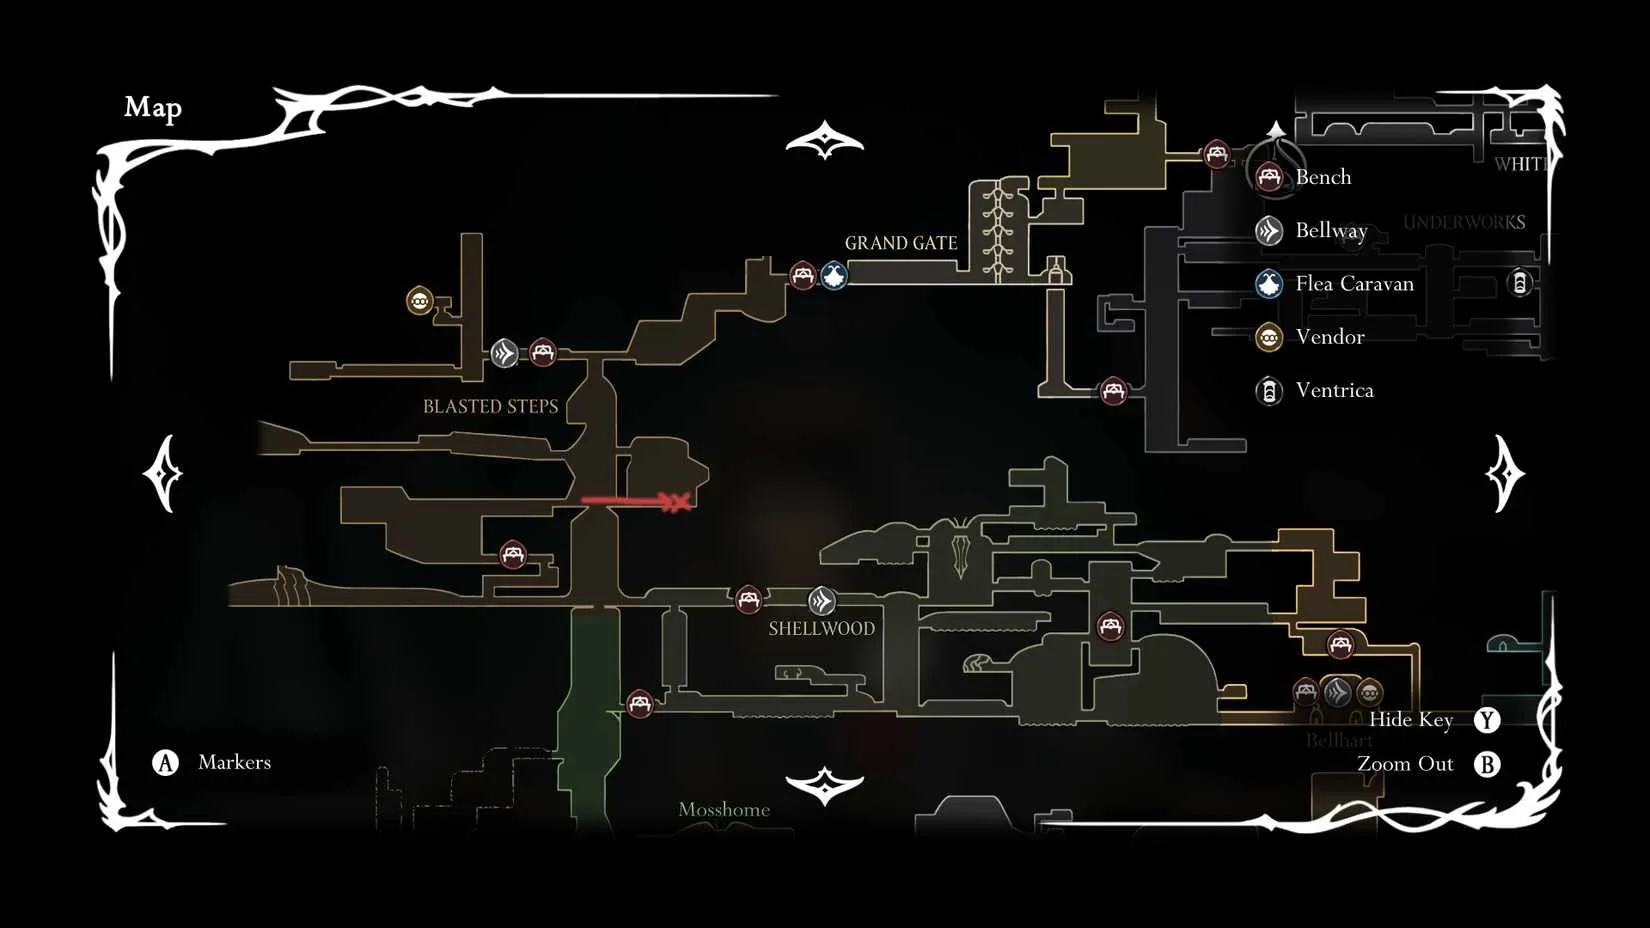
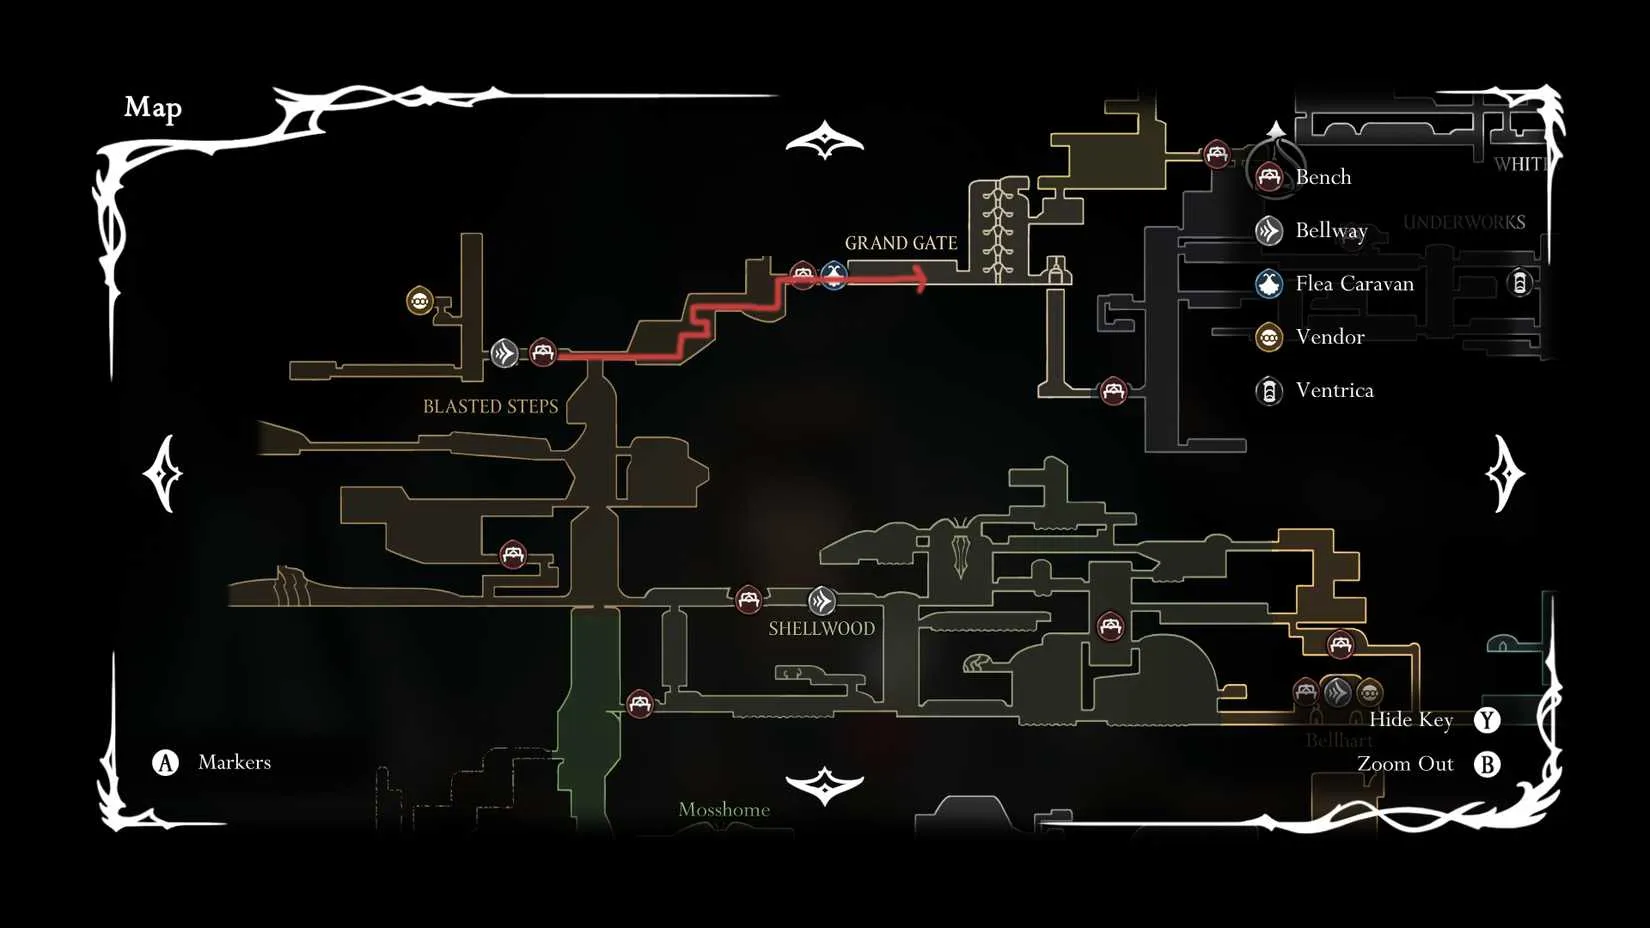
With the map in hand, the next objective is vertical. Hornet must climb the tall chamber until she finds the Bellway station of the Blasted Steps. There are two ways up — straight from Shakra's room, or out the door and up from the corridor beyond — and both funnel to the same platform. It is worth resting at the bench, unlocking the fast-travel point, and only then pressing east.
The Grand Gate and the Last Judge ⚖️
East of the Bellway, the path narrows and the wind sharpens until Hornet arrives at the Grand Gate itself. Here the Needolin proves its worth: the gate does not open to strength or speed, only to song. This is precisely why the Bellhart curse could never be postponed.
And then the gate delivers its price. A boss encounter with the Last Judge begins, a fight that punishes anyone who wandered in without a nearby respawn point. That is the quiet reason the bench by the Grand Gate matters so much — losing the duel and waking up half a region away is a far crueler punishment than the fight itself.
A Quick Checklist Before the Gate ✅
Break the Bellhart curse and claim the Needolin
Use the hidden upward passage near the Bone Bottom bench for a shortcut
Buy the Blasted Steps map from Shakra
Unlock the Blasted Steps Bellway and rest at the bench
Approach the Grand Gate, play the Needolin, and brace for the Last Judge
Shellwood taught Hornet how to hold on. Bellhart taught her how to speak. The Grand Gate is where those two lessons finally meet — and where the Citadel begins to listen.
Runs through the Blasted Steps tend to teach the same lesson in different ways: preparation is what separates a clean ascent from a loop of painful resets. That mindset is worth carrying over before you even press start — entering the Citadel with your tools upgraded, your map collection complete, and your patience intact turns a punishing climb into something closer to a dance. Plenty of players only discover how much they enjoy this style of exploration after they've already committed to a full playthrough, which makes getting the base game at a fair price the first real decision of the journey.
If you're still weighing whether to take that first step, browsing a site like cheapest steam keys from DealNest is a practical way to compare prices before committing, so the only thing left to worry about is the Last Judge's timing. Once the download is done, the checklist above is waiting — and the Grand Gate won't open itself.
|
|
|
|
| Silksong: How I Got the Putrified Ducts Map for Free |
|
Posted by: xtameembb - 10-08-2026, 10:05 AM - Forum: My Forum
- No Replies
|
|
In the vast, labyrinthine kingdom of Pharloom, a map is more than a tool—it's a lifeline. I've spent countless hours wandering through Hollow Knight: Silksong, and I've learned that every Rosary counts. So when I discovered that the Putrified Ducts map could be acquired for free, I dropped everything to track it down. Here's how I did it, step by step, so you can save your Rosaries for more important things—like upgrades and fast travel.
Unlike most maps in Silksong, which require you to find a mapmaker and pay a hefty sum, the Putrified Ducts map is simply sitting on a table. No transaction, no haggling. Just a free map waiting to be claimed. But getting there is no walk in the park. The area is accessible only from the Memorium, not from Bilewater as some might think. The top part of the Putrified Ducts is hidden behind a secret path, and if you're not careful, you'll miss it entirely.
Start at the Memorium entrance and head up to the first door on your right. Proceed forward, cutting down any enemies in your path. Soon, you'll drop down near a door marked with a sign. Enter it and perform a double jump to access a secret path. This leads you to a large bridge. Here, you'll need to use your Clawline to the left, double jump, then Clawline to the right, and finally climb the wall. Look for a breakable part—destroy it and avoid the spikes inside as you run to the right. This brings you to the Putrified Ducts.
Step
Action
1
Start at Memorium entrance, go up to first door on right
2
Proceed past enemies, drop down near door with sign
3
Enter, double jump into secret path to large bridge
4
Use Clawline left, double jump, Clawline right, climb wall
5
Destroy breakable part, avoid spikes, run right to Putrified Ducts
6
Jump down from bridge, avoid swamp with maggots
7
Proceed right across platforms, jump to higher one, continue to door
8
Enter next room, glide down to Bellway sign, pay Rosaries for fast-travel/bench
9
Return outside, glide down to left room
10
Walk to end, jump up to bait veins, get carried up, break free
11
Approach table, take Putrified Ducts map for free
Once you're in the Putrified Ducts, jump down from the bridge, but beware of the swamp infested with maggots. Slowly proceed right across the platforms until you can jump to a higher one. Keep moving in the same direction, fighting or avoiding enemies, until you reach a door. Hornet can reach this door from either a lower or higher path, but I found the higher one to be safer. The lower path is filled with annoying flying enemies that have ranged attacks, plus those veins that trap you. It's also closer to the swamp, so one misstep and you'll lose silk.
Before I continue, let me emphasize how crucial the Clawline is. Without it, you can't traverse the gap on the bridge. Similarly, the double jump is mandatory for reaching the secret path and for some platforming sections. So if you're attempting this early, make sure you have these abilities. I learned this the hard way when I first tried without the Clawline—let's just say it didn't end well.
The swamp with maggots is particularly nasty. Those little critters can swarm you and drain your health quickly. I recommend taking them out from a distance if possible, or just sprinting past them. The platforms are your friend; stay on them and avoid falling into the muck.
Upon entering the next room, glide down slowly until you see the Bellway sign. Head inside and pay some Rosaries to unlock fast travel and a bench to rest. This is a crucial checkpoint. Once you're done, return outside and glide the rest of the way down to enter the left room. Walk until the end and jump up to bait the veins. This will trap Hornet and effortlessly carry her up without taking any damage. Before the plant at the top consumes her, smash the attack button to break free and land on the floor. Approach the table at the end and take the Putrified Ducts map for free. No Rosaries required.
I was overjoyed. Not only did I save Rosaries, but I also unlocked a valuable map that would make exploring the rest of Pharloom much easier. Now I can freely explore or revisit any old areas I missed. The map reveals all the hidden routes, benches, and fast travel points, turning a confusing maze into a manageable adventure.
So there you have it. The Putrified Ducts map is a hidden gem that every Silksong player should grab early. It's a bit of a trek, but the reward is well worth it. Just remember to bring your Clawline and double jump abilities, and be prepared for a few tricky jumps. Happy exploring!
? Quick Tips:
?️ Always prioritize maps in new areas.
? Save Rosaries for fast travel and upgrades.
⚔️ Use the higher path to avoid flying enemies.
? Watch out for the maggot swamp.
? Use Clawline and double jump effectively.
If you're the type who loves hunting down every secret and squeezing value out of every purchase, that same mindset can pay off outside of Pharloom too. Keeping tabs on game deals is a smart habit, whether you're looking for your next indie obsession or a title to fill the wait for more Silksong updates.
That's where check game prices comes in handy—DealNest lets you compare costs across stores so you can grab a bargain without the guesswork. It's a simple way to stay thrifty in real life, just like you are with Rosaries in the game.
|
|
|
|
| Silksong Magnetite Dice: How I Got It and Why It Matters |
|
Posted by: xtameembb - 10-08-2026, 03:28 AM - Forum: My Forum
- No Replies
|
|
As a longtime Hollow Knight fan who has been deep in Silksong’s 2026 meta, I can tell you that the Magnetite Dice is one of those tools that sounds like a joke until it saves your run. ? It is a Yellow Tool, and its in-game description claims it brings luck to the wearer. After testing it across dozens of boss attempts, I can confirm that description is vague for a reason: the Dice gives you a small chance to completely ignore an attack that would have damaged you. That is not a guarantee. It is more like a parachute that opens only when the wind feels like it.
What the Magnetite Dice Actually Does
Let me be blunt: the Magnetite Dice is not a god-mode button. It is a probability trinket. When equipped, there is a low chance that an incoming hit will deal zero damage. You might survive a fatal blow one moment and then eat a full combo the next. The emphasis is on low chance. If you are expecting consistent defense, you will be disappointed. If you are expecting a tiny, chaotic edge in a boss fight, you will get exactly that.
Because it is a Yellow Tool, it competes with a surprisingly shallow pool of offensive options in that color. For many builds, that makes the Magnetite Dice a must-equip for boss fights and elite enemy encounters. I slot it whenever I know a single mistake could end a long attempt.
Where to Find Lumble the Lucky
To get the Magnetite Dice the honest way, I made my way to the Blasted Steps. You can access this area after acquiring the Wall Jump ability in Shellwood and then heading to the top-left part of the map. Once inside, I worked through the platforming section and climbed until I reached the Bellway Station. After interacting with the bench, I headed left and down, where a passage leads to Lumble the Lucky.
Lumble is a gambler. He asks you to play a game of dice with him. The game is purely random. A win grants you 4 Rosaries, while a loss sets you back 4 Rosaries. The key to winning the Tool is to play and win 40 Rosaries from Lumble. The catch is that you need ten net wins, and every loss pushes you backward. If you rely on raw luck, this can take up to an hour.
The Save-Scum Method That Actually Works
Luckily, there is a way to cheese through this while also ensuring you win. I used it, and it turned a frustrating hour into a manageable ritual.
First, make sure you have rested at the nearby bench.
Play with Lumble until you have a 16–20 Rosary lead.
Once you have that lead, simply Save and Quit. You will be teleported back to the bench.
Go back to Lumble. If you lose three times consecutively, quit the game without saving. This returns you to that 16–20 Rosary mark.
Keep saving your progress once every 12 Rosaries gained. Repeat until the Dice is yours.
This method is like save-scumming a casino where the dealer is a bug with a death wish. It is not elegant, but it works.
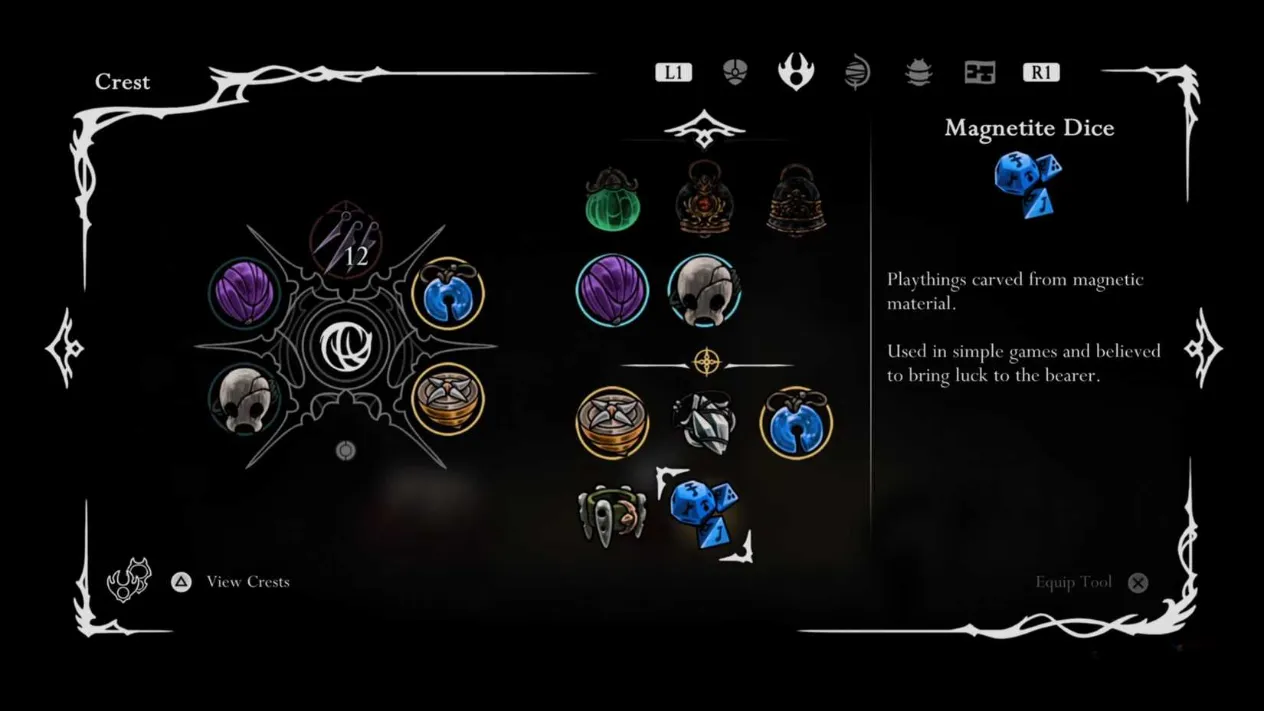
The Easier Act 1 Method
There is a second method to acquire the Dice, and it is far less stressful. It involves completing the first Act and reaching the Coral Chambers inside the Citadel. Once you do that, you can revisit Lumble the Lucky only to find him lying dead. You can interact with the item near him, which is the Dice. No gambling, no save-scumming, no RNG. Just a sad discovery and a free Tool.
If you are already past Act 1, this is the route I recommend. If you are still early and want the Dice before a difficult boss, the Lumble method is your only option.
Why the Magnetite Dice Matters in Combat
The Magnetite Dice’s description states that it is believed to bring luck to the wearer. Even though this description can be a little vague, equipping it and trying it in combat will give you some idea of what it does. The tool makes it so that there is a small chance that an attack that would hit and deal damage to you will not deal any damage.
You might think this tool is overpowered, but the emphasis should be on the low chance. The chances of the effect triggering are very low. Even though it can sometimes save you in situations where you would be dead otherwise, you will not find it useful all the time. The tool is Yellow, and with how few offensive tools you have for that color, this is a must-equip for boss fights or enemy encounters.
Attribute
Detail
Tool Type
Yellow Tool
Effect
Small chance to negate incoming damage
Best Use
Boss fights, elite enemies, desperate escapes
Acquisition
Lumble dice game or Act 1 Coral Chambers corpse
RNG Level
High, but manageable with save-scumming
I treat it like a ghost in the machine that occasionally rewrites my death sentence. It is a lottery ticket where the prize is one more second of life. Sometimes that second is all you need to land the final hit.
Final Thoughts for 2026
As of 2026, the Magnetite Dice remains one of Silksong’s most interesting Yellow Tools. It has not been nerfed into oblivion, and it has not been buffed into a mandatory slot. It sits in that perfect sweet spot of unreliable but unforgettable. If you are early in the game, use the save-scum method at Blasted Steps. If you are late, just finish Act 1 and pick it up from Lumble’s corpse. Either way, equip it before your next boss attempt. The Magnetite Dice is not a shield. It is a rumor of a shield. And sometimes that rumor is enough.
If the Dice hunt has you thinking about how much time you have sunk into Hallownest's successor, or if you are still deciding whether to pick up Silksong for a friend who has not yet made the jump, it is worth watching for a sale rather than paying full price on impulse. Metroidvanias in particular tend to cycle through discounts fairly often, and the difference between a full-price purchase and a seasonal deal can cover a good chunk of your next indie purchase.
Rather than refreshing store pages every few days, you can use a tracker that aggregates discounts across platforms. Sites like DealNest make that easier by collecting current offers in one place, so before you commit to a purchase — or gift someone a copy — it is worth taking a minute to check game prices and see whether patience will save you a few dollars.
|
|
|
|
| Silksong's Simple Keys and Locked Doors: A 2026 Guide to Rosaries, NPCs, and Secrets |
|
Posted by: xtameembb - 10-08-2026, 02:26 AM - Forum: My Forum
- No Replies
|
|
In 2026, Hollow Knight: Silksong continues to be a labyrinthine metroidvania where backtracking is not a chore but a conversation with earlier failure. Among its most intriguing optional pursuits are the four Simple Keys, items scattered across the first two Acts. These keys do not advance the critical path; instead, they function like a locksmith's skeleton key for the game's hidden narratives, opening doors that yield NPC storylines, new routes, and substantial Rosary caches. For players who measure progress in map percentage and lore fragments, locating every Simple Key remains a rite of passage. The following account, compiled from community exploration and in-game discovery, details where each key rests and what each lock reveals.
The Four Simple Keys
Key
Location
Acquisition
Cost or Requirement
1
Bone Bottom Shop
Purchase from the shopkeeper beside the Wish Board
500 Rosaries
2
Sinner's Road
Defeat the Roachkeeper after a climbing puzzle near the top
Access to Sinner's Road above Halfway Home in Greymoor
3
Sands of Karak
Found on a bench beside a poor bug
Requires Hornet's grappling hook in Act 2; reach via Blasted Steps west
4
Jubilana the Merchant
Purchase from Jubilana at the First Shrine in the Citadel
Complete Wish "The Wandering Merchant"; 650 Rosaries
The first key is the most straightforward, yet it demands patience. In Bone Bottom, the shopkeeper next to the Wish Board offers the Simple Key for 500 Rosaries. That price is a small fortune in the early hours, when every Rosary feels like a bead of sweat. Players who prioritize the key must delay other purchases, turning the shop into a study in opportunity cost.
The second key hides in Sinner's Road, a vertical gauntlet above Halfway Home in Greymoor. After reaching the upper reaches and potentially repairing the bench, adventurers face a compact climbing puzzle. At its summit waits a Roachkeeper. Killing this foe drops the key, a reward that feels less like a drop and more like a toll collected by a hostile gatekeeper.
The third key resides in the Sands of Karak, a region unlocked after obtaining Hornet's grappling hook in Act 2. Access comes through the Blasted Steps on the far west of the map. The Sands themselves are a traversal puzzle of staggering precision, a desert that behaves like a living combination lock. After encountering the elevator that returns to the Grand Gate's entrance, players head east through a blocked-off door. Inside, a bench holds a poor bug and the key. The scene is quiet, almost mournful, as if the key were a relic left by someone who could not escape.
The fourth key requires narrative legwork. In the Citadel, next to the First Shrine, Jubilana the Merchant sells the final Simple Key for 650 Rosaries. Before she does, players must pick up the Wish "The Wandering Merchant" and track her down in the Citadel. Once that quest is complete, she relocates to the First Shrine. The key is expensive, but it is also a symbol of a relationship earned rather than a transaction forced.
The Four Doors They Unlock
Door
Location
Reward or Consequence
Deep Docks
Underground, lava-filled ruins
Access to a challenging area with stronger enemies and a boss
Sinner's Road
Immediately south of the area's bench
Frees the jailed Green Prince
Wormways
Northeastern side of Bone Bottom
Two routes: bottom path with worm vomit, or higher path with volatile earth; leads deeper into Wormways
High Hills
Just before the Gauntlet fight in the Citadel
A large cache of Rosaries rather than a new area or NPC
The first door most players encounter sits in Deep Docks, an underground ruin of lava and grating. After unlocking the fast travel point, the path heads east and down grates opened by levers. Continuing east over lava leads to a large locked door. The area beyond is no gentle tutorial; its boss and enemies are far stronger than what early-game travelers have faced. The door is a warning wrapped in a reward.
The second door lies in Sinner's Road, immediately south of the bench. Using the Simple Key found in the same region opens the cell and frees the Green Prince. This is one of Silksong's clearest examples of a key doing narrative work: the lock is not a barrier but a cage, and the reward is a character's freedom.
The third door is in Wormways, on the northeastern side of Bone Bottom. Two approaches exist. The lower route is a straight path to the door, but it requires avoiding vomit from a large worm. The higher entrance demands navigation across volatile earth. Both lead to more Wormways, reinforcing the region's layered, intestinal design.
The fourth door, in High Hills, is unusual because it is not out of the way. It sits just before the Gauntlet fight in the Citadel. Unlike the other doors, it primarily leads to a boatload of Rosaries rather than a new area or NPC encounter. For players chasing upgrades, this door is a piggy bank with a lock.
Strategic Takeaways for 2026
? Budget Rosaries early: the Bone Bottom key costs 500, and Jubilana's costs 650. Saving requires discipline.
?️ Treat keys as map multipliers: each one opens content that can feed back into exploration.
⚔️ Prepare for Deep Docks: the enemies and boss there punish underprepared builds.
? Follow NPC threads: the Green Prince and Jubilana quests show how Silksong blends combat with character work.
? Explore Wormways carefully: both routes have hazards, but the region rewards persistence.
In 2026, Silksong's Simple Keys remain a masterclass in optional design. They are not required to finish the story, yet they transform the map from a set of corridors into a web of promises. For players who seek every secret, the keys are less like items and more like invitations written in iron. The doors they open may lead to treasure, to prisoners, or to nothing more than a pile of Rosaries, but each one confirms that in Silksong, curiosity is always worth the cost.
The same instinct that makes a locked door in Deep Docks worth the detour — weighing the cost of entry against what waits behind it — is the instinct that serves players well outside of Hallownest and Pharloom. A key priced at 500 Rosaries is only "expensive" until you compare it to the alternatives and realize what it unlocks. That habit of scanning the map, comparing options, and refusing to pay full price for something you can get for less is exactly what turns a careful explorer into a savvy buyer.
If that mindset follows you out of the game, DealNest is built for it — a place where the comparison work is already done, so you can skip the guesswork and go straight to the reward. Whether you're chasing a rare item or just stretching a limited budget across a long list of wants, the goal is the same one Silksong teaches: never spend more than the door is worth. Check the listings, compare the options, and find the best deal before you commit.
|
|
|
|
|


